
StrongBar v1
cBot
Pepperstone에서 테스트함
버전 3.0, May 2026
Windows, Mac, Mobile, Web
4.5
리뷰: 2
1
구매
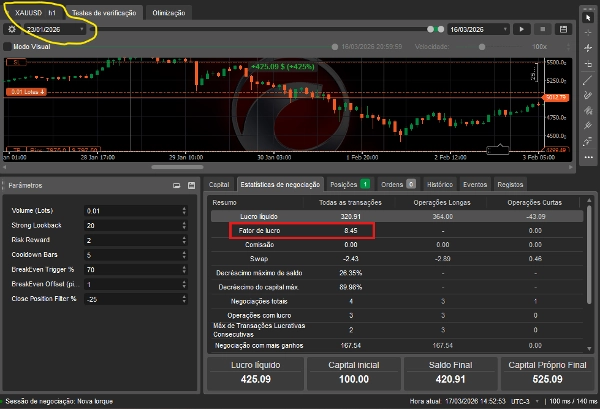
28.5%
ROI
4.44
손익비
10.41%
최대 낙폭
설명
StrongaBar Trader
개요
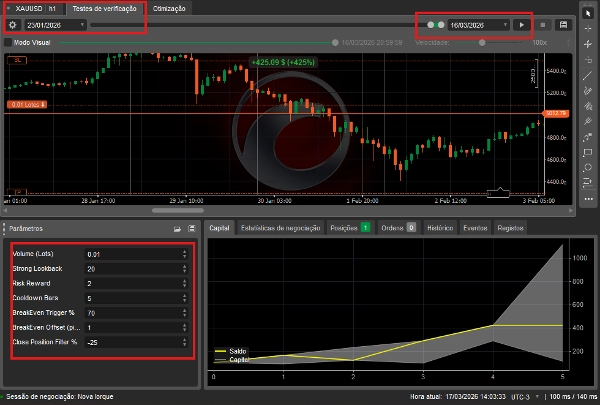
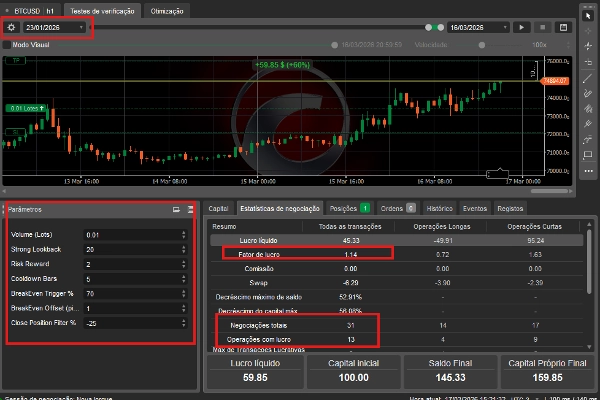
StrongaBar Trader는 세 가지 독립적인 필터가 동시에 일치할 때만 거래를 진입합니다: EMA를 통한 추세 방향, RSI 임펄스 존을 통한 모멘텀 강도, 그리고 강한 종가를 가진 지배적인 신호 바. 이 다중 레이어 합류 방식은 낮은 품질의 진입을 줄이고 봇이 확신이 높은 설정에 집중하도록 합니다. 포지션 관리는 손익분기점과 트레일링 스톱을 포함하며, 둘 다 독립적으로 구성할 수 있습니다.
작동 방식
매 닫힌 바마다 봇은 다음을 확인합니다:
- 신호 바 — 바는 최근 N개의 바 중 가장 큰 몸통을 가져야 하며, 종가는 범위의 상단(강세) 또는 하단(약세) 부분에 있어야 합니다.
- EMA 필터 — 가격은 EMA의 올바른 쪽에 있어야 하며, EMA는 최소 기울기를 보여 추세 모멘텀을 확인해야 합니다.
- RSI 필터 — RSI는 정의된 임펄스 존 내에 있어야 하며, 이는 움직임에 모멘텀이 있지만 소진되지 않았음을 확인합니다.
세 가지가 모두 일치하면 신호가 준비됩니다. 진입은 다음 바의 시가(모드 0) 또는 신호 바의 고가/저가 돌파(모드 1)에서 실행됩니다.
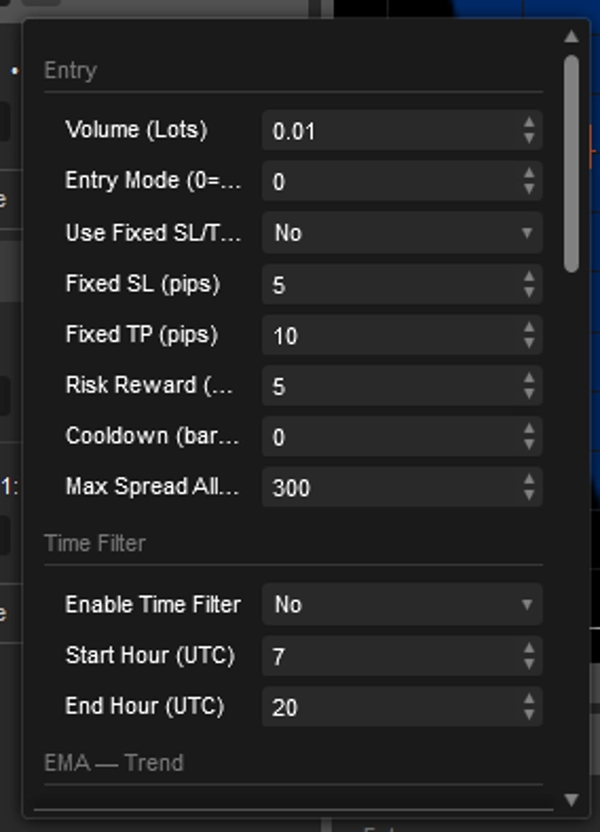
진입 매개변수
- 거래량 — 로트 단위의 포지션 크기.
- 진입 모드 — 0: 신호 후 바로 다음 바의 시가에서 진입. 1: 가격이 신호 바의 고가(매수) 또는 저가(매도)를 돌파할 때까지 대기.
- 고정 SL/TP 사용 — 켜짐일 때는 바 기반 SL 계산을 무시하고 고정 핍 값을 사용합니다. 꺼짐일 때는 SL은 신호 바에서 파생되고 TP는 위험 대비 보상으로 계산됩니다.
- 위험 대비 보상 — TP = SL × RR. 고정 SL/TP가 꺼져 있을 때만 활성화됩니다.
- 쿨다운 — 거래 종료 후 봇이 대기하는 바 수. 연속 신호 후 과도한 거래를 방지합니다.
- 최대 스프레드 — 현재 스프레드가 이 값(핍 단위)을 초과하면 진입이 차단되거나 취소됩니다(모드 0은 즉시 취소).
시간 필터
- 시간 필터 활성화 — UTC 시간 창으로 진입을 제한합니다. 창 외부에서는 봇이 열린 포지션만 관리합니다.
- 시작 / 종료 시간 — 허용된 거래 시간 창을 UTC로 정의합니다.
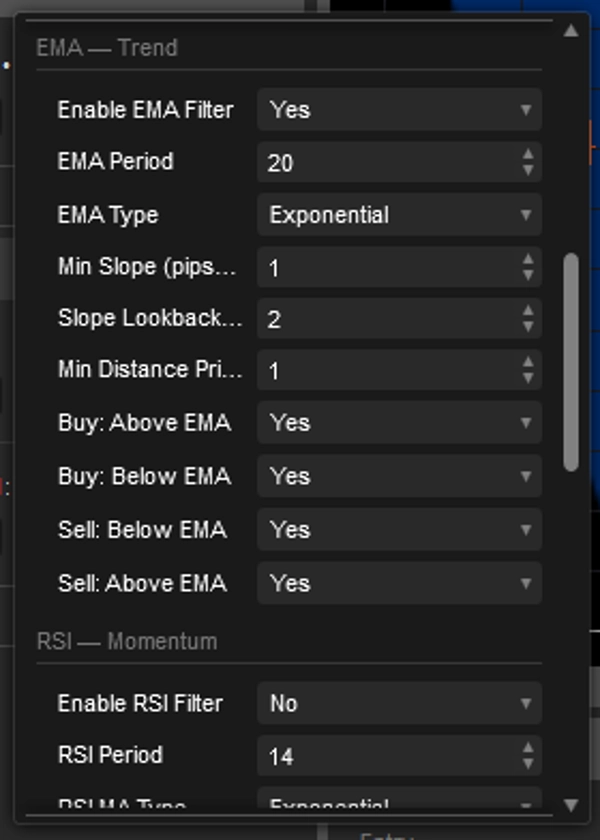
EMA — 추세 필터 (레이어 1)
- EMA 필터 활성화 — 꺼짐일 때는 봇이 EMA 검사를 완전히 건너뛰고 신호 바와 RSI만 사용합니다.
- EMA 기간 / 유형 — 추세 기준선을 정의합니다.
- 최소 기울기 — EMA는 최근 N개의 바에서 최소 X 핍만큼 상승/하락해야 합니다. 횡보장이나 횡보 시장에서의 진입을 방지합니다.
- 기울기 측정 바 수 — 기울기를 측정할 바의 개수.
- 가격과 EMA 간 최소 거리 — 진입 허용 전 가격이 EMA에서 최소 X 핍 떨어져 있어야 합니다.
- EMA 위/아래 매수 / EMA 위/아래 매도 — 각 방향에 대해 EMA의 어느 쪽이 유효한지 제어합니다. 같은 방향에 대해 위와 아래를 모두 활성화하면 해당 측면의 포지션 검사가 사실상 비활성화됩니다. ⚠️ 매수 위 또는 매수 아래가 모두 비활성화되면 매수 신호는 절대 발생하지 않습니다.
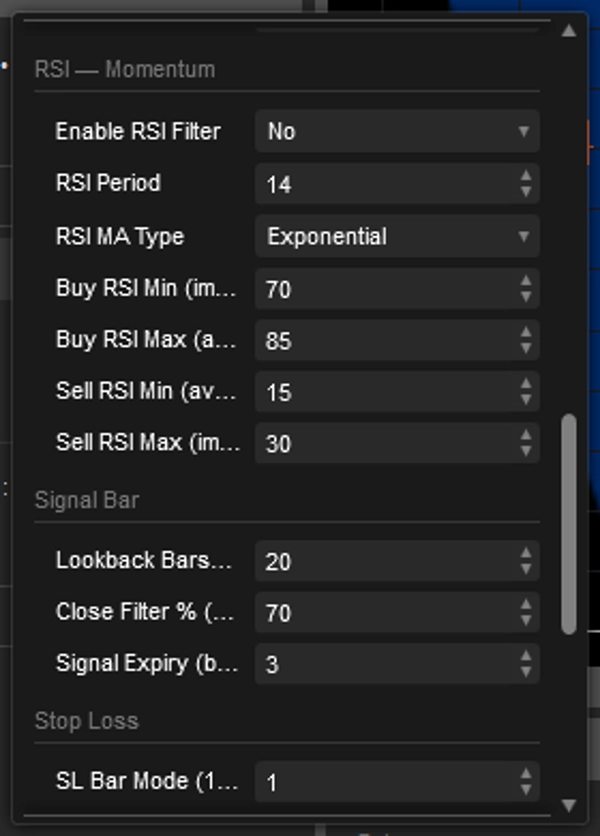
RSI — 모멘텀 필터 (레이어 2)
- RSI 필터 활성화 — 꺼짐일 때는 RSI를 완전히 무시합니다. 봇은 신호 바 + EMA만으로 진입합니다.
- RSI 기간 — RSI 계산의 민감도.
- 매수 RSI 최소 / 최대 — 매수를 허용하려면 RSI가 이 범위 내에 있어야 합니다(예: 50–75: 모멘텀은 상승 중이지만 소진되지 않음).
- 매도 RSI 최소 / 최대 — 매도를 허용하려면 RSI가 이 범위 내에 있어야 합니다(예: 25–50: 모멘텀은 하락 중이지만 과매도 상태는 아님).
⚠️ 어느 쪽이든 최소값이 최대값 이상이면 해당 영역은 무효이며 그 방향의 신호는 발생하지 않습니다. 시작 시 로그에 경고가 출력됩니다.
신호 바 — 구조 필터 (레이어 3)
- 기준 바 수 — 신호 바의 몸통은 최근 N개의 바 중 모든 몸통보다 엄격히 커야 합니다. 값이 높을수록 엄격하고 신호가 적어집니다.
- 종가 필터 % — 강세 신호의 경우 종가는 바 범위 상단 X% 내에 있어야 합니다. 약세 신호의 경우 하단 X% 내에 있어야 합니다. 예: 70%는 종가가 캔들 상단 30%(강세) 또는 하단 30%(약세) 내에 있어야 함을 의미합니다.
- 신호 만료 — 모드 1 전용. 돌파가 이 바 수 내에 발생하지 않으면 신호가 폐기됩니다.
손절매
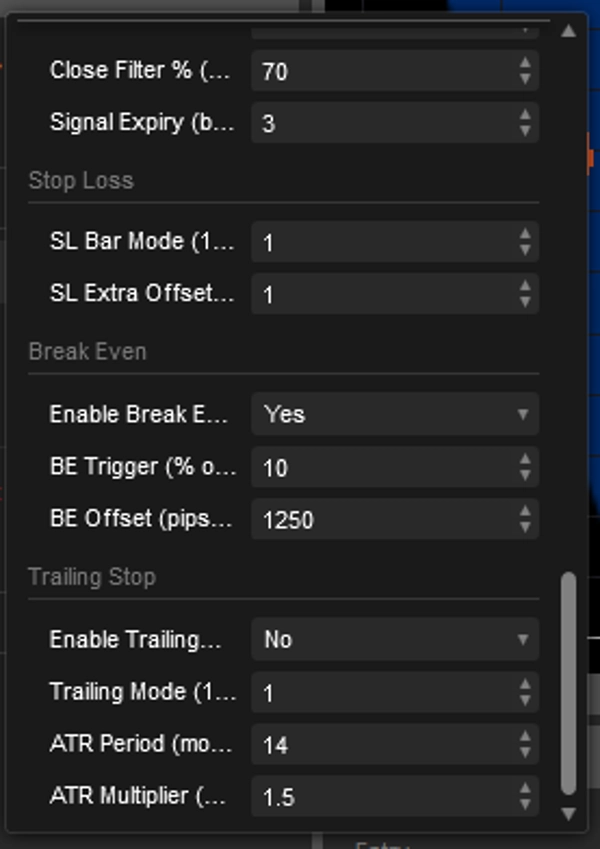
- SL 바 모드 — SL이 신호 바의 아래/위에서 얼마나 떨어져 배치되는지 정의합니다. 모드 1: 바의 저가/고가에 위치. 모드 2: 저가/고가를 기준으로 1× 범위만큼 더 떨어진 위치. 모드 3: 2× 범위 등. 모드가 높을수록 SL이 더 넓어집니다.
- SL 추가 오프셋 — 계산된 SL 수준을 넘어 추가되는 핍 버퍼로, 명확한 수준에서 스톱 헌트를 방지합니다.
⚠️ 고정 SL/TP가 켜져 있을 때는 SL 바 모드와 오프셋이 무시됩니다.
손익분기점
- 손익분기점 활성화 — 켜져 있을 때, 가격이 TP를 향해 정의된 비율만큼 이동하면 SL이 진입가(소량의 오프셋 포함)로 이동합니다.
- BE 트리거 % — BE가 활성화되기 전에 가격이 진입→TP 거리의 몇 %를 이동해야 하는지. 예: 40%는 가격이 TP까지 40% 이동했을 때 BE가 작동함을 의미합니다.
- BE 오프셋 — 새로운 SL을 위해 진입가를 넘어 추가되는 핍으로, 평탄한 손익분기점 대신 최소 이익을 확보합니다.
⚠️ 손익분기점이 꺼져 있고 트레일링도 꺼져 있으면, 포지션은 원래 SL과 TP에 의해서만 관리되며 동적 조정은 발생하지 않습니다.
⚠️ 트레일링이 켜져 있으면 손익분기점이 작동한 후에만 활성화됩니다. 손익분기점이 꺼져 있으면 트레일링은 진입 시점부터 즉시 시작됩니다.
트레일링 스톱
- 트레일링 스톱 활성화 — 꺼져 있을 때, 봇은 손익분기점 이후 모든 동적 SL 이동을 중지합니다. SL은 거래 종료 시까지 BE 수준에 고정됩니다.
- 트레일링 모드 1 (바 시가) — 각 새 바가 형성될 때마다 SL이 진입 이후 가장 높은(매도) 또는 가장 낮은(매수) 바 시가로 이동합니다. 부드럽고 단계적인 트레일링.
- 트레일링 모드 2 (ATR) — SL이 현재 가격에서 ATR × 배수 거리만큼 동적으로 따라갑니다. 시장 변동성에 적응합니다.
- ATR 기간 / ATR 배수 — 모드 2에서만 사용됩니다. 배수가 높을수록 트레일이 넓어지고 변동성이 큰 상품에서 조기 종료 위험이 줄어듭니다.
요약
AI 요약
StrongBar v1 is an algorithmic trading bot designed for Forex and cryptocurrency markets, focusing on confirmed breakout entries with layered technical filters. It uses a three-filter confluence approach: trend direction confirmed by an Exponential Moving Average (EMA) with slope requirements, momentum strength validated by the Relative Strength Index (RSI) within defined impulse zones, and a dominant signal bar characterized by the largest body in recent bars with a strong close position. Trades are entered either at the next bar's open or upon breakout of the signal bar’s high/low.
The bot supports configurable position sizing, fixed or dynamic stop loss and take profit levels, and risk-reward settings. It includes advanced position management features such as break-even adjustments and trailing stops with multiple modes, including ATR-based volatility trailing. A time filter restricts trading to specified UTC hours to manage market activity periods. Spread limits and cooldown periods help control trade frequency and execution quality.
StrongBar v1 operates primarily on hourly charts and supports market order types. It is designed for medium-frequency day trading with a focus on disciplined execution and risk management. Backtested on leveraged accounts, it aims to reduce noise and improve trade conviction through multi-layer technical confirmation.
트레이딩 프로필
트레이딩 스타일
데이 트레이딩
전략 유형
추세
분석 유형
알고리즘
기술
거래 빈도
중간
최소 권장 잔고
$100
거래당 위험
2%
차트 기간
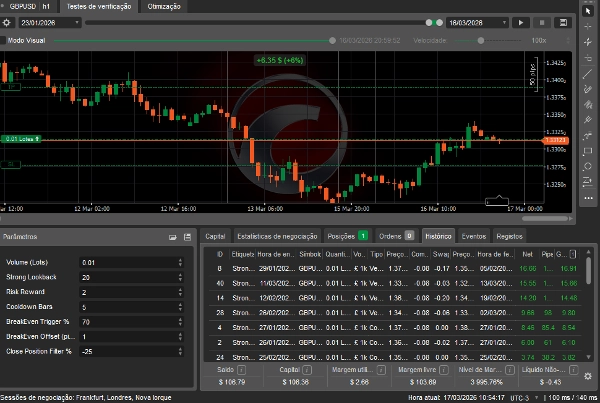
1시간
백테스트 레버리지
1:500
일일 낙폭 한도
5%
프랍 트레이딩 회사 규정 부합
—
위험 관리
위험 모델
고정 랏
동적
고정 위험 비율
지원되는 주문 유형
시장
최대 수량 (랏)
100
지원되는 위험 통제
손절매
이익실현
추적 손절매
손익분기
뉴스 필터
고객 리뷰
4.5
리뷰: 2
5 | 50 % | |
4 | 50 % | |
3 | 0 % | |
2 | 0 % | |
1 | 0 % |
상담
자주 묻는 질문(FAQ)
Forex
Signal
Breakout
Scalping
Crypto
AI
ATR
트레이딩 봇, 지표, 플러그인 등 cTrader Store에서 제공되는 상품은 제3자 개발자에 의해 제공되며, 이는 단순히 정보 및 기술적 접근을 목적으로 제공된 것입니다. cTrader Store는 중개인이 아니며, 투자 조언, 개인별 추천 또는 향후 성과에 대한 어떠한 보장도 제공하지 않습니다.
이 작성자의 상품 더 보기


가격
593.86K
거래량
25.15K
핍 수익
4
판매
259
무료 설치