
Deskripsi
MultiTF EMA Dominator
A multi-timeframe EMA engine that dominates structure, trend and risk — built for cTrader.
MultiTF EMA Dominator is an advanced trading robot for cTrader designed for traders who want to systematically exploit how price reacts to exponential moving averages (EMAs) across multiple timeframes.
It combines:
- Multi-timeframe EMA stack (from 1m up to Daily)
- Dynamic EMA scoring (touches, bounces, crosses, slope flips)
- Trend-aware, rule-based entries (with-trend vs counter-trend, fully controlled)
- Side-specific risk management (separate LONG/SHORT SL/TP, BE and trailing)
- Equity drawdown hedge module
- Built-in rolling backtest analytics (to find the best starting windows)
- Rich visual overlays so you always see why the bot is doing what it’s doing
All inside a single cBot, with no external files or convoluted setup.
Code-side note: in cTrader the class is still
MultiTF_EMA_StrategyBot, but the product name for selling/branding is MultiTF EMA Dominator.
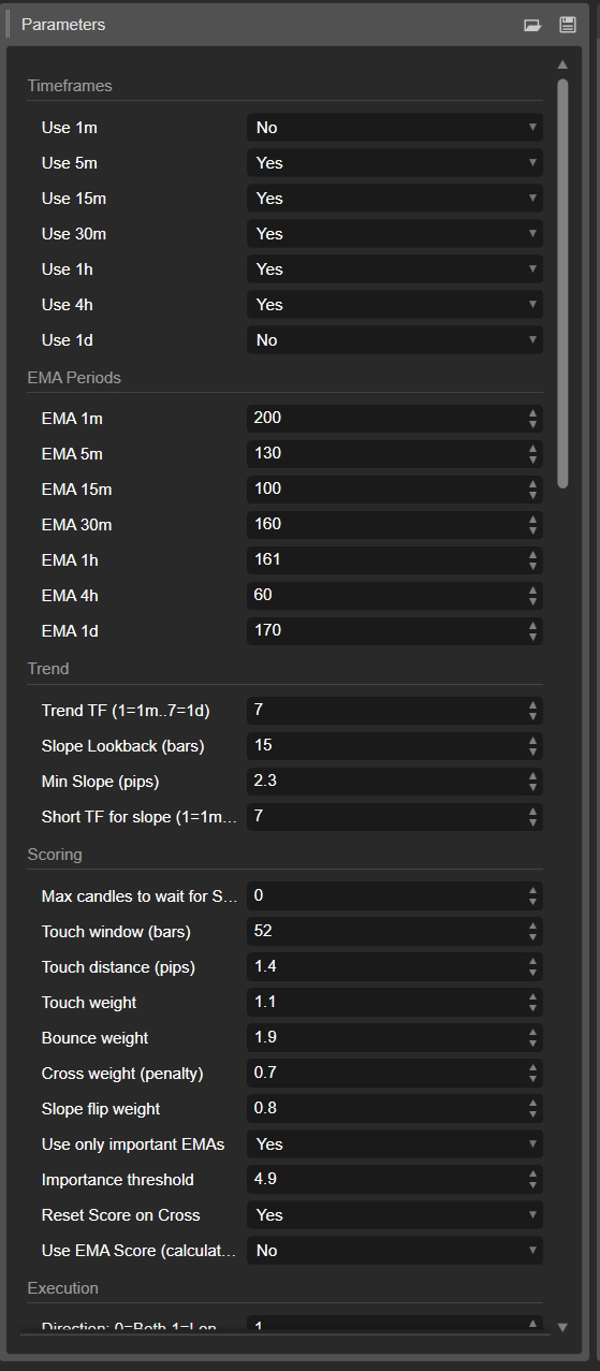
1. Multi-Timeframe EMA Engine
MultiTF EMA Dominator lets you build a stack of EMAs across several timeframes:
- 1m, 5m, 15m, 30m, 1h, 4h, 1d
- Each timeframe gets its own EMA period (default 200, fully configurable)
You can:
- Enable/disable each timeframe individually (
Use 1m,Use 5m, …) - Fine-tune EMA periods (
EMA 1m,EMA 5m, …) - See each EMA on the chart as:
- A horizontal line at the current level
- A historical curve (configurable history length)
- Optional labels with TF, period and live score
The result is a multi-layer EMA grid that the Dominator uses to detect:
- EMA touches and near-touches
- Bounces away from EMAs
- Crosses through EMAs
- Trend-aligned breakouts between EMAs
2. Trend Engine & EMA Scoring
Trend Detection
You can choose which timeframe defines the main trend:
Trend TF (1=1m..7=1d)
On that TF the bot calculates the EMA slope over N bars (Slope Lookback) and converts it into pips:
- Slope >
Min Slope (pips)→ Bullish trend - Slope < −
Min Slope (pips)→ Bearish trend - Otherwise → Flat
There’s also a short-term trend context via:
Short TF for slope (1=1m..7=1d)
used specifically in outer band conditions (when price is far outside the EMA pack).
EMA Scoring (Reversal / Respect Strength)
Every EMA receives a dynamic score that measures how much price “respects” it as support/resistance.
Score components:
- Touches (price hitting or nearly hitting the EMA)
- Controlled by
Touch distance (pips)andTouch weight
- Controlled by
- Bounces (price rejects the EMA and moves away)
- Weighted by
Bounce weight
- Weighted by
- Crosses (price slicing through the EMA)
- Penalized by
Cross weight
- Penalized by
- Slope flips (EMA changes direction)
- Rewarded by
Slope flip weight
- Rewarded by
- Optional score reset on cross
Reset Score on Crosscan zero the score when a cross happens
You can also:
- Filter EMAs by importance:
Use only important EMAs+Importance threshold - Globally disable scoring:
Use EMA Score (calculation)= false
When scoring is active, it drives:
- Which EMAs are considered “important enough” to trade
- Position sizing via
Score weight on size(high-score EMAs get larger size)
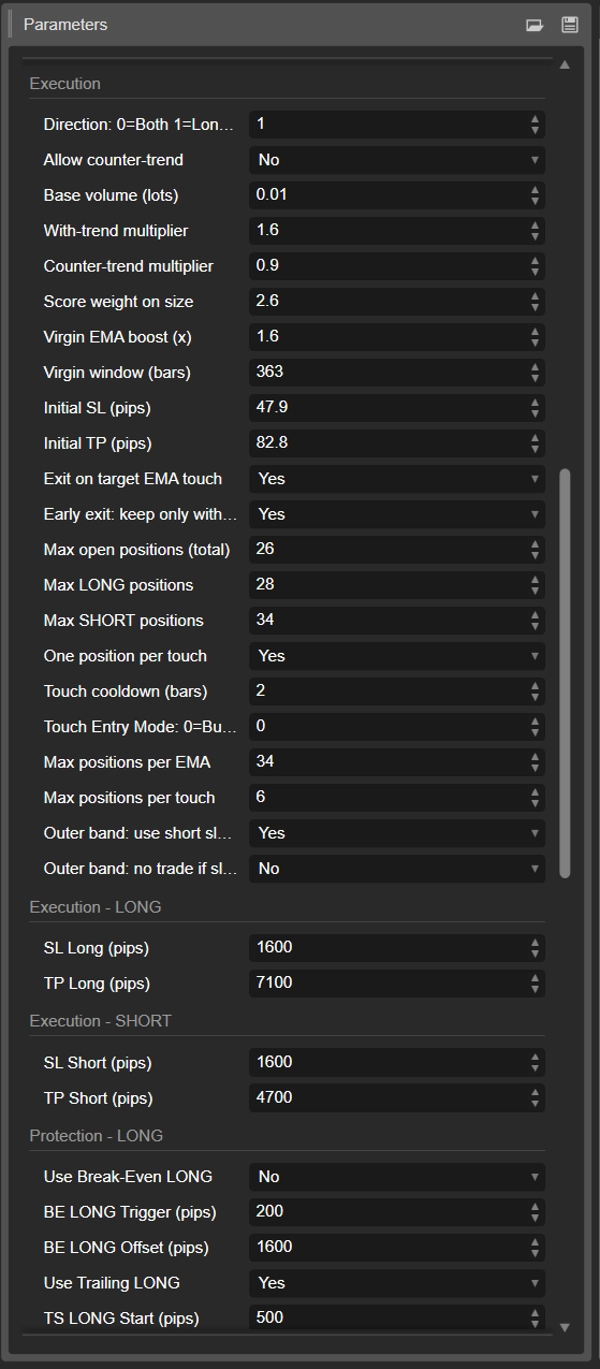
3. Execution Logic: Touches, Breakouts & Outer Band Dominance
Direction & Trend Alignment
Basic direction control:
Direction: 0=Both 1=Long only 2=Short onlyAllow counter-trend:true→ bot can take both with-trend and counter-trend setupsfalse→ strictly with-trend only
Touch Entries (Core EMA Interaction)
On every bar, for each active EMA:
- The bot checks if the candle has touched / crossed / come very close to that EMA.
- It decides the side:
- If previous close was above the EMA → Buy (long off support)
- If previous close was below the EMA → Sell (short off resistance)
- It selects a target EMA:
- For a Buy → usually the next higher EMA
- For a Sell → the next lower EMA
You get a very clear logic: entries taken exactly where price interacts with your EMA structure, with targets based on the next EMA in the stack.
Position control parameters:
Max open positions (total)Max LONG positions (-1 = no limit)Max SHORT positions (-1 = no limit)Max positions per EMAMax positions per touchOne position per touch+Touch cooldown (bars)to avoid over-stacking on the same bar
Touch Entry Mode
Touch Entry Mode: 0=Burst 1=Incremental- Burst: can open multiple entries in one touch, up to
Max positions per touch - Incremental: opens progressively, candle after candle, respecting cooldowns
- Burst: can open multiple entries in one touch, up to
This makes MultiTF EMA Dominator adaptable both for aggressive stacking and more conservative entries.
Outer Band Logic (Extreme Extension)
When price is:
- Above all EMAs → extreme bullish extension
- Below all EMAs → extreme bearish extension
the bot switches to outer band mode:
- It checks the short-term EMA slope (
Short TF for slope). - If
Outer band: no trade if slope < MinSlopePipsis enabled and the slope is too flat, it skips trading (no entries in dead, stretched markets). - It chooses the trade side:
- Short-term slope ≥ 0 → Buy
- Short-term slope < 0 → Sell
- It always assigns:
- Reference EMA: top or bottom EMA in the pack
- Target EMA: same side boundary, so exits are always clearly defined
This gives you controlled entries in extreme price extensions, always with a defined EMA context.
Breakout Logic (Trend-Following Mode)
Besides EMA touches, MultiTF EMA Dominator also detects EMA breakouts in the direction of the main trend:
- In a bullish trend:
- If price breaks above an upper EMA (
IsBreakUp) and conditions are met → it can open Buy entries with the next EMA as potential target.
- If price breaks above an upper EMA (
- In a bearish trend:
- If price breaks below a lower EMA (
IsBreakDown) → it can open Sell entries.
- If price breaks below a lower EMA (
These are pure pro-trend continuation trades, complementing the more mean-reverting touch logic.
4. Position Sizing: Trend, Score & Virgin EMAs
Position size is computed as a combination of:
- Base volume
Base volume (lots)
- Trend multiplier
With-trend multiplierif aligned with trendCounter-trend multiplierif against trend (only if allowed)
- EMA Score factor (if scoring is enabled)
- Score normalized vs
Importance threshold - Scaled by
Score weight on size
- Score normalized vs
- Virgin EMA boost
- If the EMA has not been touched for more than
Virgin window (bars) - Size is multiplied by
Virgin EMA boost (x)
- If the EMA has not been touched for more than
After that, the bot converts lots → units and clamps them to broker min / max / step automatically.
This gives Dominator a dynamic risk profile: more size where it statistically sees better EMAs (high score + virgin), less size on marginal setups.
5. Side-Specific Risk Management
MultiTF EMA Dominator treats longs and shorts as two separate “species” and lets you manage them independently.
Separate SL/TP for Long & Short
You can configure both:
SL Long (pips)andTP Long (pips)SL Short (pips)andTP Short (pips)
If any of those is set to 0, the bot falls back to the shared:
Initial SL (pips)Initial TP (pips)
This flexibility is extremely useful when a market behaves differently on the long vs short side.
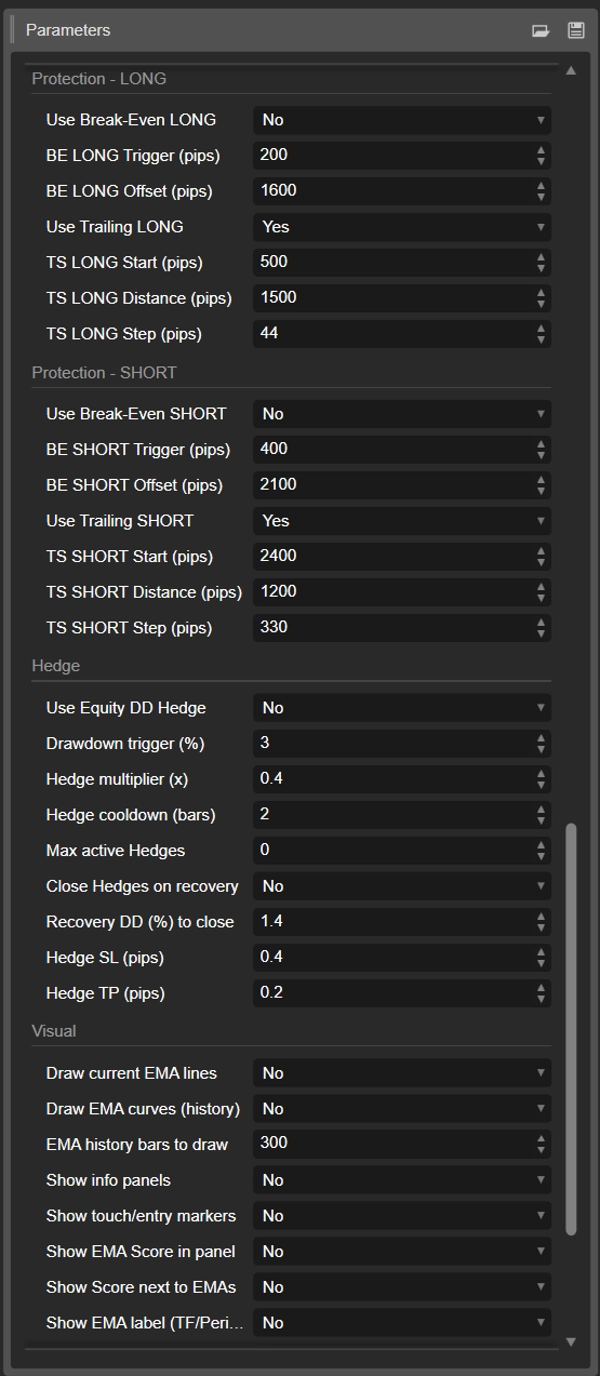
Break-Even (per side)
LONG:
Use Break-Even LONGBE LONG Trigger (pips)BE LONG Offset (pips)
SHORT:
Use Break-Even SHORTBE SHORT Trigger (pips)BE SHORT Offset (pips)
Once a position’s floating profit in pips exceeds the trigger:
- For LONG: SL moves to Entry + Offset
- For SHORT: SL moves to Entry − Offset
Trailing Stop (per side)
LONG:
Use Trailing LONGTS LONG Start (pips)TS LONG Distance (pips)TS LONG Step (pips)
SHORT:
Use Trailing SHORTTS SHORT Start (pips)TS SHORT Distance (pips)TS SHORT Step (pips)
Trailing only activates after profit ≥ Start.
Then, SL follows price at the given Distance, updating only when movement ≥ Step.
Early Exit: Always Realign With Trend
Early exit: keep only with-trend trades
If enabled, on each bar Dominator:
- Evaluates the current trend (Bullish, Bearish, or Flat)
- Closes all positions that are not aligned with that trend
This is a powerful way to ensure the portfolio is always dominated by trend-aligned positions, and not stuck fighting the main move.
6. Equity Drawdown Hedge Module
Dominator includes an equity-based hedge layer that acts as a safety net when things go wrong.
Key parameters:
Use Equity DD HedgeDrawdown trigger (%)Hedge multiplier (x)Hedge cooldown (bars)Max active HedgesClose Hedges on recoveryRecovery DD (%) to close- Optional:
Hedge SL (pips)andHedge TP (pips)
How the hedge works:
- The bot continuously monitors drawdown % = (Balance − Equity) / Balance.
- When DD exceeds
Drawdown trigger (%), it: - Calculates net exposure (net units Buy vs Sell)
- Opens a hedge trade in the opposite direction of that net exposure
- Scales size with
Hedge multiplier (x), respecting volume min/max
- If
Close Hedges on recoveryis enabled and DD goes back belowRecovery DD (%) to close, all hedge positions are closed.
This gives you a built-in circuit breaker, helping to protect the account during unexpected volatility clusters or model breakdowns.
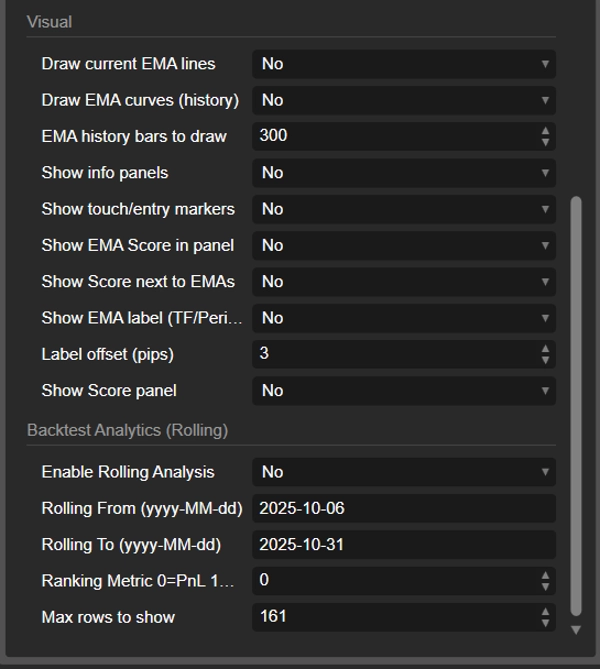
7. Visual Transparency & Panels
MultiTF EMA Dominator is designed to be visually explainable:
- EMA current level lines for each timeframe
- EMA historical curves (configurable history length)
- Optional EMA labels showing TF, period, and score
- Touch and outer-band markers (colored dots at interaction points)
- Right info panel (if
Show info panelsandShow Score panelare enabled): - Shows either live Score or Slope per timeframe
- Bottom help panel with a quick reminder of parameter groups
You always see:
- Which EMA was touched or broken
- Where Dominator entered and in which direction
- Which EMAs are steep / flat
- Which EMAs are considered “strong” by the scoring engine
This transparency is a strong selling point: you’re not buying a black box, but a structured EMA framework you can actually read on the chart.
8. Rolling Backtest Analytics (Built-In)
Dominator also includes a backtest analytics module called Rolling Start Analysis.
Parameters:
Enable Rolling AnalysisRolling From (yyyy-MM-dd)Rolling To (yyyy-MM-dd)Ranking Metric 0=PnL 1=Pips 2=WRMax rows to show
At backtest end (OnStop):
- The bot collects all closed trades in the chosen date range.
- For every possible start date between From and To, it calculates:
- Number of trades
- Net profit
- Net pips
- Win rate
- It ranks those starting dates by:
- Net profit (PnL), or
- Total net pips, or
- Win rate
- It prints the top results in the log and shows a compact summary panel on the chart.
This is incredibly useful for:
- Finding the best calibration windows
- Seeing from which day a strategy/settings combination really started to “dominate” the market
- Doing optimization without exporting anything to Excel
9. Who Is MultiTF EMA Dominator For?
This bot is a great fit for:
- Traders who believe in EMA structure (mean reversion + trend following)
- Users who want precise, rule-driven entries around EMAs rather than vague pattern recognition
- Traders who want to control longs and shorts independently
- System traders who appreciate deep customization and built-in analytics
- Users who want an extra layer of equity protection during deep drawdown scenarios
You can deploy MultiTF EMA Dominator on:
- A single symbol with highly tuned parameters
- Multiple markets in parallel, each instance with its own configuration
10. Commercial Positioning – Why “Dominator” Sells
From a marketing perspective, MultiTF EMA Dominator has several strong angles:
- 🧠 Clear edge narrative: multi-timeframe EMA grid + scoring + trend + hedge
- 🎛️ Highly configurable, but with a very coherent internal logic
- 🛡️ Serious risk management: per-side rules + equity hedge + early exit with trend
- 🔍 Full transparency via visual overlays and panels (easy to showcase in screenshots & videos)
- 📊 Built-in analytics that most competitors don’t offer out of the box
You’re not just offering “an EMA bot”; you’re offering a complete EMA-based trading framework that:
- Detects and trades EMA structure
- Adjusts size based on score and trend
- Protects equity during drawdowns
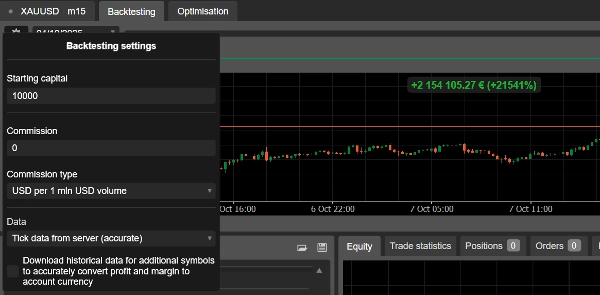
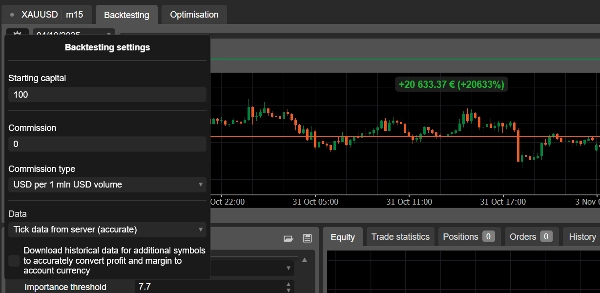
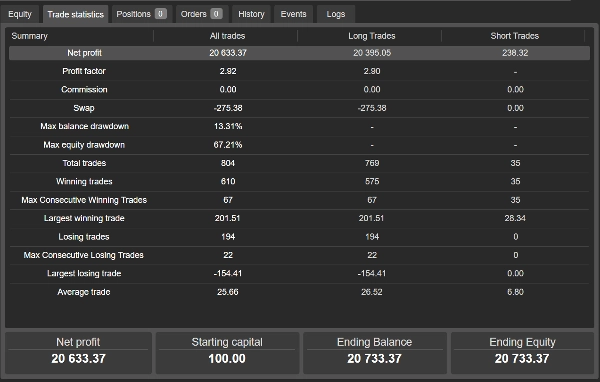
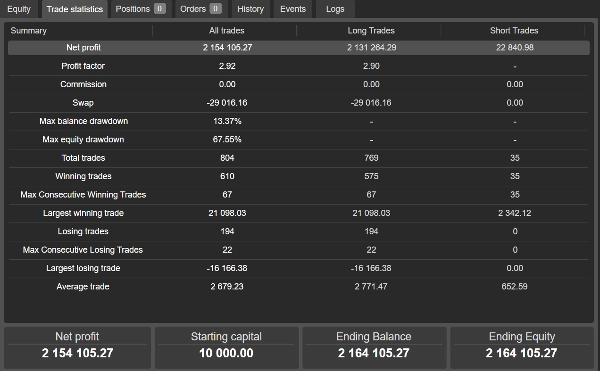
Backtest results only. No commissions, no slippage. Past performance does not guarantee future results.
Ringkasan
Ulasan pelanggan
5 | 50 % | |
4 | 0 % | |
3 | 50 % | |
2 | 0 % | |
1 | 0 % |