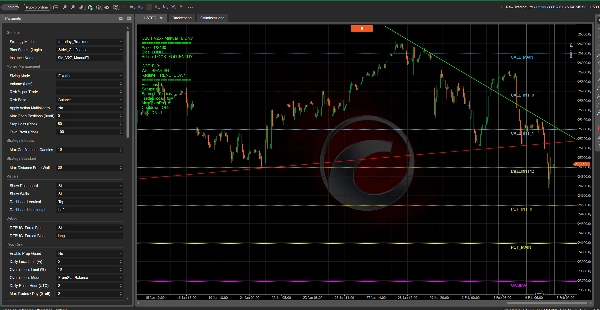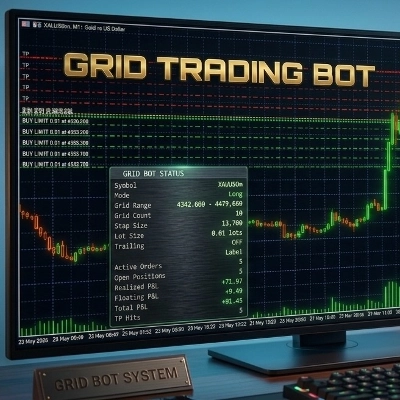
This system is built as a “trading trinity”: three independent engines that can be used stand-alone or combined into a full workflow.
- Wall Sentinel (Options Walls / Gamma Wall)
- Downloads options-based levels (Put/Call walls + Gamma Wall) and draws them directly on the chart.
- These walls act as institutional support/resistance, reaction zones, risk areas and potential targets.
- Commitment of Traders (COT)
- Integrates weekly positioning data and converts it into actionable signals.
- The COT is downloaded every week on Friday at 21:00, then analyzed to produce signals for the supported assets (depending on the feed coverage).
- Trendline Pro (Manual Trendlines System)
- Adds a “discretionary-assisted” layer: you can draw manual trendlines and let the bot handle:
- touch detection,
- breakout confirmation (multiple methods),
- trade execution and management (SL/TP + filters).
How you can use it: single logic or combined
You can choose your preferred trading “idea”:
- Walls only: trade around institutional walls (great for intraday structure).
- COT only: weekly macro/positioning bias filter (directional compass).
- Trendlines only: manual trendline trading with automated execution/management.
- COT + Walls: weekly bias + intraday levels (stronger filtering, fewer random trades).
- Walls + Trendlines: options levels + trendline timing (very clean setups).
- COT + Trendlines: weekly bias + manual triggers.
- Full Trinity: the bot builds context (Bias + Action), while trendlines provide precision timing.
Data updates schedule
- COT: weekly update → Friday at 21:00.
The system analyzes it and produces a signal (buy/sell/neutral) for supported assets. - Wall Sentinel: live updates 3 times per day → 09:00, 15:00, 23:00.
At every update, walls are refreshed and re-drawn on the chart.
Manual trendlines: upgrading an already complete base
COT + Walls already provide a complete “context + levels” framework.
Manual trendlines are the optional upgrade to:
- improve timing precision,
- create asset-specific setups,
- add a discretionary visual confirmation without losing automation.
You can also choose to run trendlines only, or use them as the final trigger when Bias and conditions are aligned.
Dashboard explained (what you see on screen)
The dashboard is your real-time control center:
- Asset: current instrument and data mapping
- Bias: final directional bias (LONG / SHORT / NEUTRAL)
- Action: signal style/strength (AGGRESSIVE_LONG, TREND_FOLLOW, LIGHT, etc.)
- COT: current weekly COT signal
- Wall: wall-derived bias (LONG/SHORT/NEUTRAL)
- Regime: market context (trend, gamma squeeze, range, volatility… based on the feed)
- Positions: open positions count
- Setups: pending trendline setups waiting for confirmation
- Spread: current spread in pips
- TradesToday: daily trades counter and limit (if enabled)
- MaxOpenPos: max open positions (if enabled)
- Cooldown: cooldown status (if enabled)
- PROP: prop risk guard status (block or soft-lock long/short)
In short: the dashboard tells you what the bot is reading, why it trades or doesn’t, and keeps risk + context + execution fully transparent.
PARAMETER
General
- Strategy Mode
Selects the main operating style (e.g., Intraday_Breakout vs Standard_SmartMoney).
Note: In this version, most of the execution is driven by bias/action + manual trendlines, but this setting is kept for workflow consistency. - Bias Source (Logic)
Chooses how the final bias is computed from the data sources: - Strict_Confluence: trade only when COT and Wall agree
- Follow_COT_Ignore_Wall: bias from COT only
- Follow_Wall_Ignore_COT: bias from Walls only
- Follow_GammaWall: bias from Gamma/Regime first, fallback to Wall
- Follow_GammaWall_Plus_COT: Gamma/Regime + COT confirmation rules
- Instance Name
Label used to tag and filter this cBot’s positions (so it manages only its own trades).
Money Management
- Sizing Mode
- FixedLots: fixed lot size every entry
- RiskPercent: calculates volume based on risk % and Stop Loss pips
- Volume (Lots)
Fixed lot size used when Sizing Mode = FixedLots (and also as fallback if risk calc can’t be computed safely). - Risk % per Trade
Used when Sizing Mode = RiskPercent. Risk amount is computed from the chosen Risk Base. - Risk Base
Defines the “capital base” for risk sizing: - Balance or Equity
- Apply Action Multiplier to Risk
If enabled, the bot adjusts volume based on the current Trading Action (e.g., aggressive actions may increase sizing, cautious actions may reduce it).
If disabled, action multipliers affect sizing only in FixedLots mode. - Max Open Positions (0=off)
Maximum number of open positions allowed for this bot + symbol. 0= unlimited
- Stop Loss (Pips)
SL distance in pips for each trade (used for both execution and risk sizing when RiskPercent is enabled). - Take Profit (Pips)
TP distance in pips for each trade.
Strategy Intraday
- Max Confirmation Candles
Maximum number of candles allowed for breakout confirmation logic (kept as part of the system design).
Strategy Standard
- Max Distance From Walls (Pips)
Defines how close price should be to the option walls for “standard” proximity-based behavior (kept for the system completeness).
Visuals
- Show Dashboard
Enables/disables the on-chart dashboard panel. - Show Walls
Enables/disables drawing of option wall levels on the chart. - Dashboard Vertical
Dashboard vertical placement: Top / Center / Bottom. - Dashboard Horizontal
Dashboard horizontal placement: Left / Center / Right.
Debug
- DEBUG: Force Bias
Forces a custom bias (overrides real data). - DEBUG: Forced Bias
The forced value used when “Force Bias” is enabled (example: LONG / SHORT / NEUTRAL).
Prop Risk
- Enable Prop Guard
Enables risk protection rules (daily/overall loss monitoring + optional lock logic). - Daily Loss Limit (%)
Maximum allowed daily drawdown % (based on Day Start Equity). If exceeded, the breach action is applied. - Overall Loss Limit (%)
Maximum allowed overall drawdown % (based on the selected Overall Loss Mode). If exceeded, it can become permanent lock. - Overall Loss Mode
- FromStartBalance: overall loss calculated from starting balance
- FromPeakEquity: overall loss calculated from peak equity (more strict after gains)
- Daily Reset Hour (UTC)
Hour in UTC used as “daily boundary” for resetting daily counters and daily loss reference. - Max Trades / Day (0=off)
Daily trade limit. 0= unlimited
- On Breach
What happens when daily/overall limit is hit: - BlockNewTrades: stop opening new trades
- ClosePositionsAndBlock: close positions (all, or only locked side if SoftLockSide) and then block
- Breach Lock Mode
- BlockAll: blocks all trading (classic behavior)
- SoftLockSide: blocks only the side (LONG or SHORT) tied to the breach logic
- Enable Cooldown
Enables the cooldown timer after each trade (prevents immediate re-entries). - Cooldown Minutes
Minutes the bot must wait after a trade before it can open another trade.
Manual Trendlines
- Enable Trendline Trading
Turns the manual trendline module ON/OFF. - Ignore Bias (Trendlines)
If enabled, trendline entries can trigger even when bias is NEUTRAL or opposite. - Ignore Action (Trendlines)
If enabled, trendline entries don’t require Trading Action permission. - Entry Mode
- InstantTouch: enters immediately when price touches the trendline
- PendingConfirmation: waits for confirmation logic (breakout confirmation)
- Confirmation Logic
Used when Entry Mode = PendingConfirmation: - TimeDuration: breakout must remain beyond the line for X seconds
- CandleClose: confirmation after a bar closes beyond the breakout level
- WaitFixedBars: waits a set number of bars, then confirms breakout
- Min Duration (Seconds)
Only for TimeDuration confirmation: seconds price must stay beyond breakout. - Bars to Wait
Only for WaitFixedBars: number of bars to wait before confirming breakout. - Max Timeout (Bars)
Maximum number of bars a setup stays active before expiring. - Contrarian on Timeout?
If enabled, when a setup expires it can attempt a contrarian entry (reverse direction), if filters allow it. - Ignore Horizontal Lines
If enabled, the bot ignores horizontal line objects and focuses on trendlines. - Exclude Lines (comma-separated)
Names/prefixes/patterns to ignore (defaultSM_to avoid trading the bot’s own objects like dashboard/walls). - Exclude Match Mode
How the exclusion list is interpreted: - Contains / StartsWith / Exact / Wildcard (
*and?supported in Wildcard)
- Contains / StartsWith / Exact / Wildcard (
RSI FILTER
- Trigger Distance (Pips)
Distance threshold to detect a “touch” near a trendline and start the setup logic. - Use RSI Filter
Enables/disables RSI filtering. - RSI Timeframe
Timeframe used to compute RSI (e.g., Hour1). - RSI Period
RSI lookback period. - RSI Max
For BUY setups: RSI must be <= RSI Max to allow entry. - RSI Min
For SELL setups: RSI must be >= RSI Min to allow entry.
TRADE MANAGEMENT
- Max Spread (Pips)
Blocks entries if spread exceeds this threshold. - Use Break Even
Enables break-even logic. - BE Trigger (Pips)
When the position reaches this profit in pips, BE will be applied. - BE Lock (Pips)
Extra pips added beyond entry when moving SL to BE (locks some profit). - Use Trailing Stop
Enables trailing stop logic. - TS Trigger (Pips)
Profit in pips required before trailing starts. - TS Step (Pips)
Trailing distance/step used when updating SL.
BASKET MANAGEMENT
- Use Basket TP
Closes all bot positions when total net profit reaches target. - Basket TP (Money)
Total net profit target (currency of the account). - Use Basket SL
Closes all bot positions when total net profit falls to loss limit. - Basket SL (Money)
Total net loss limit. - Use Basket BreakEven
When basket profit reaches a threshold, sets SL to entry for open positions (basket-level protection). - Basket BE Trigger (Money)
Profit threshold that triggers basket BE.
Pyramiding
Enable Pyramiding
Enables adding positions in the direction of an existing trade.
Max Adds (0=off)
Maximum number of additional entries per side.
0 = disabled
Step Distance (Pips)
Distance in pips price must move in favor before adding a new pyramid position.
Reference Price
Defines how the add levels are calculated:
FirstPosition: adds based on the first entry price
LastPosition: adds based on the most recent entry price
BreakEvenPrice: adds based on the weighted break-even price
BE Gate Mode
Controls whether pyramiding is allowed only after BE conditions:
None: no gate
FirstOnly: first position must be at/near BE rules before adding
EachAdd: each new add requires BE conditions on the last position
Volume Multiplier / Add
Multiplier applied to the base volume for each add (ex: 1.0 = same size, 1.2 = increases per add).
Min Seconds Between Adds
Minimum time required between pyramiding entries (anti-spam protection).
Respect RSI Filter
If enabled, pyramiding entries must pass RSI filter too.
Respect Action Filter
If enabled, pyramiding is allowed only when Trading Action permits trading.
Disclaimer: This is educational risk-management guidance, not financial advice.
1) Core rule: who leads when they disagree?
COT (weekly) = macro positioning / institutional direction, slower but more “structural”.
Gamma / Regime / Walls (intraday) = micro context (squeeze, trend, range, volatility), can contradict COT for hours/days.
Manual Trendline = price trigger: your “chart confirmation” and often the best referee when there’s conflict.
Practical takeaway:
When COT and Gamma disagree, reduce discretion: either wait for the trendline, or decide in advance which source you follow.
2) Tools you already have in the bot (to choose a scenario)
- Bias Source (Logic): Strict / Follow_COT / Follow_GammaWall / etc.
- Enable Trendline Trading: ON/OFF
- Ignore Bias (Trendlines): allows trendline-only even with neutral/opposite bias
- Ignore Action (Trendlines): allows trendline-only even when “Action” would block trades
- Entry Mode + Confirmation Logic: filters false breakouts (TimeDuration / CandleClose / FixedBars)
- MaxSpread / Cooldown / MaxTradesDay / Prop Guard: keeps the demo safer and controlled
OPERATIONAL SCENARIOS (main ones + variations)
Scenario A — Full alignment (“golden path”)
COT = LONG and GammaBias = BULLISH (or COT = SHORT and GammaBias = BEARISH)
✅ Recommended:
- Trade only in the shared direction
- Use Trendline as the trigger (best with PendingConfirmation)
- If you want to be more aggressive: pyramiding ON, but with BE gate.
Typical settings
- Bias Source: Strict_Confluence (or GammaWall+Cot)
- Ignore Bias (Trendlines): false
- Confirmation: TimeDuration or CandleClose
Scenario B — COT LONG, GammaBias BEARISH (“macro vs micro” conflict)
Often a weekly bullish view vs an intraday pullback / mean reversion.
B1) Conservative: Trendline-only (referee = price)
✅ What you do:
- Ignore the conflict and take only what the trendline confirms
- If trendline breaks short while COT is long → either no trade or contrarian intraday.
Settings
- Bias Source: anything (even Strict), but:
- Ignore Bias (Trendlines): true (for true trendline-only)
- Ignore Action (Trendlines): optional (keep false if you want higher quality)
B2) COT-guided: LONG only, trendline as confirmation
✅ What you do:
- Even if Gamma is bearish, you allow ONLY LONG entries when the trendline/structure confirms (bullish breakout).
Settings
- Bias Source: Follow_COT_Ignore_Wall
- Ignore Bias (Trendlines): false (so it only enters with LONG bias)
- Contrarian on Timeout: false (avoid short reactions)
B3) Opportunistic intraday: small counter-COT trades
✅ What you do:
- Accept that Gamma dominates intraday: trade in the Gamma direction but with reduced risk + stricter confirmations.
Settings
- Bias Source: Follow_GammaWall
- Confirmation: CandleClose or higher TimeDuration
- Pyramiding: usually OFF in counter-trend
Scenario C — COT SHORT, GammaBias BULLISH (mirror of B)
Same logic inverted:
- Trendline-only (referee = price), or
- SHORT only if you follow COT (Follow_COT), or
- LONG intraday only if you follow Gamma with reduced risk.
Scenario D — COT NEUTRAL, Gamma directional (BULLISH/BEARISH)
If COT provides no edge:
✅ Recommended:
- Follow Gamma/Regime and use trendline for timing.
Settings
- Bias Source: Follow_GammaWall
- Ignore Bias (Trendlines): false (bias won’t be neutral if Gamma is clear)
- If Gamma flips often: enable Cooldown + MaxTrades/Day
Scenario E — Regime = RANGE_BOUND (sideways market)
✅ Recommended:
- Trendline-only works great: bounce/break logic with confirmation.
- Avoid pyramiding (it can churn inside the range).
- Confirmation: TimeDuration is better (reduces fakeouts).
Settings
- Pyramiding: OFF
- Confirmation: TimeDuration
- TriggerDistance: slightly tighter (fewer random touches)
Scenario F — Regime = GAMMA_SQUEEZE (UP or DOWN)
Moves can be fast and “violent”.
✅ Recommended:
- Enter only on confirmed breakout (PendingConfirmation)
- Spread filter + cooldown matter a lot
- Pyramiding only if BE gate is active and the move is clean.
Settings
- Confirmation: CandleClose or TimeDuration (not InstantTouch)
- EnableCooldown: true
- MaxSpread: stricter
Scenario G — HIGH_VOLATILITY
✅ Recommended:
- Reduce frequency, increase quality: trendline-confirmed only
- Avoid contrarian on timeout (often gets punished).
Settings
- Contrarian on Timeout: false
- Harder confirmation
- Pyramiding: often OFF
Scenario H — LOW_VOLATILITY / NEUTRAL (no edge)
✅ Recommended:
- Either do nothing (often best),
- Or trendline-only but very selective (few trades).
Settings
- Ignore Action: false (so it avoids NO_CLEAR_SIGNAL environments)
- MaxTrades/Day: low (demo control)
Scenario I — Trendline says LONG but the system (COT/Walls) says SHORT
✅ Three coherent options:
I1) “System first”
- Do not trade that trendline (bias mismatch)
I2) “Price first”
- Trendline-only: ignore bias (Ignore Bias true)
I3) “Compromise”
- Wait for a second confirmation (CandleClose or longer duration)
- Or enter with reduced risk (manually: lower Risk%)
Scenario J — You want COT + Trendline only
✅ Logic:
- COT = weekly directional filter
- Trendline = intraday/daily timing
Settings
- Bias Source: Follow_COT_Ignore_Wall
- Ignore Bias (Trendlines): false
- Ignore Action (Trendlines): true or false (depends if you want “Action” to block)
- Confirmation: PendingConfirmation
Scenario K — You want Walls/Gamma + Trendline only
✅ Logic:
- Gamma/Regime intraday = directional filter
- Trendline = timing
Settings
- Bias Source: Follow_GammaWall
- Ignore Bias (Trendlines): false
- Confirmation: PendingConfirmation
Scenario L — You want Trendline-only (100% discretionary)
✅ Logic:
- The bot becomes an executor/manager with filters (spread, RSI, cooldown, max trades).
Settings
- Enable Trendline Trading: true
- Ignore Bias (Trendlines): true
- Ignore Action (Trendlines): true (if you want zero blocks)
- MaxSpread + Cooldown + MaxTrades/Day: enabled to prevent overtrading
Simple anti-confusion rule (always valid)
When you’re unsure between COT and Gamma:
- If the market is in squeeze/high volatility → prioritize Gamma + Trendline (intraday leads)
- If the market is in a clean multi-day trend → prioritize COT + Trendline
- If you’re still unsure → Trendline-only with stricter confirmation + fewer trades
5 | 0 % | |
4 | 100 % | |
3 | 0 % | |
2 | 0 % | |
1 | 0 % |
