RegressionZoneTrader is a cTrader cBot built around a Linear Regression line calculated on Daily (D1) closing prices. It automatically creates BUY and SELL trading zones around the regression line using a volatility/oscillation measure (Range, True Range, or Maximum Deviation from Regression). 🧠📊
It can trade using multiple entry styles:
✅ ZoneEntry → trades directly when price enters the BUY/SELL zones
✅ RegressionCrossClose → trades only after a “touch” plus a confirmed close beyond the regression line
✅ CrossCloseWithZoneFilter → same as above, but only if price is also inside the corresponding zone ✅
It also includes:
🧱 Smart pyramiding (adds only when in profit and protected)
🛡️ Separate Break-Even logic for LONG and SHORT
🏃 Separate Trailing Stop logic for LONG and SHORT
🚦 Operational limits (spread filter, max positions, max trades per day)
🔒 Prop Risk Control: equity / drawdown protection lock
🔁 SL Streak Lock: after a defined number of consecutive losing Stop Loss trades, it locks trading until the next day 📅⛔
🎨 Chart drawings: regression line + zone lines + colored rectangles for better visual guidance
📌 Note: calculations are based on Daily (D1) data, but the bot can run on any timeframe because levels are updated when a daily candle closes. calculated on Daily (D1) closing prices. It automatically creates BUY and SELL trading zones around the regression line using a volatility/oscillation measure (Range, True Range, or Maximum Deviation from Regression). 🧠📊
It can trade using multiple entry styles:
✅ ZoneEntry → trades directly when price enters the BUY/SELL zones
✅ RegressionCrossClose → trades only after a “touch” plus a confirmed close beyond the regression line
✅ CrossCloseWithZoneFilter → same as above, but only if price is also inside the corresponding zone ✅
It also includes:
🧱 Smart pyramiding (adds only when in profit and protected)
🛡️ Separate Break-Even logic for LONG and SHORT
🏃 Separate Trailing Stop logic for LONG and SHORT
🚦 Operational limits (spread filter, max positions, max trades per day)
🔒 Prop Risk Control: equity / drawdown protection lock
🔁 SL Streak Lock: after a defined number of consecutive losing Stop Loss trades, it locks trading until the next day 📅⛔
🎨 Chart drawings: regression line + zone lines + colored rectangles for better visual guidance
📌 Note: calculations are based on Daily (D1) data, but the bot can run on any timeframe because levels are updated when a daily candle closes.
📈 Calculation timeframe: DAILY (D1)
The bot:
- Loads D1 history (preload) so it can calculate regression and zones immediately 📚
- Calculates a Linear Regression on the Close prices of the last Regression Period days 🧮
- Projects the regression forward by Forecast Bars days 🔮
- Estimates Oscillation (how much price “swings”) using a selectable method 📐
- Builds BUY Zones below the regression and SELL Zones above the regression (symmetric or asymmetric) 🟩🟥
- Based on Entry Mode:
- 🟩 ZoneEntry → enters when price moves into the zone
- ✳️ RegressionCrossClose → enters only on a “touch + confirmed close” signal on the regression
- ✅ CrossCloseWithZoneFilter → same as above, but only if also inside the zone (extra filter)
Additionally includes:
- 🧱 limits on positions, spread, trades/day
- 🧗 pyramiding “breakout + retrace” (controlled add-ons)
- 🛡️ SL/TP (fixed or based on oscillation) separate for long/short
- 🧷 separate Break Even + Trailing
- 🔒 Prop-style Risk Control + (optional) lock after consecutive stop losses until next day
⚙️ Parameters — full explanation (Group by Group)
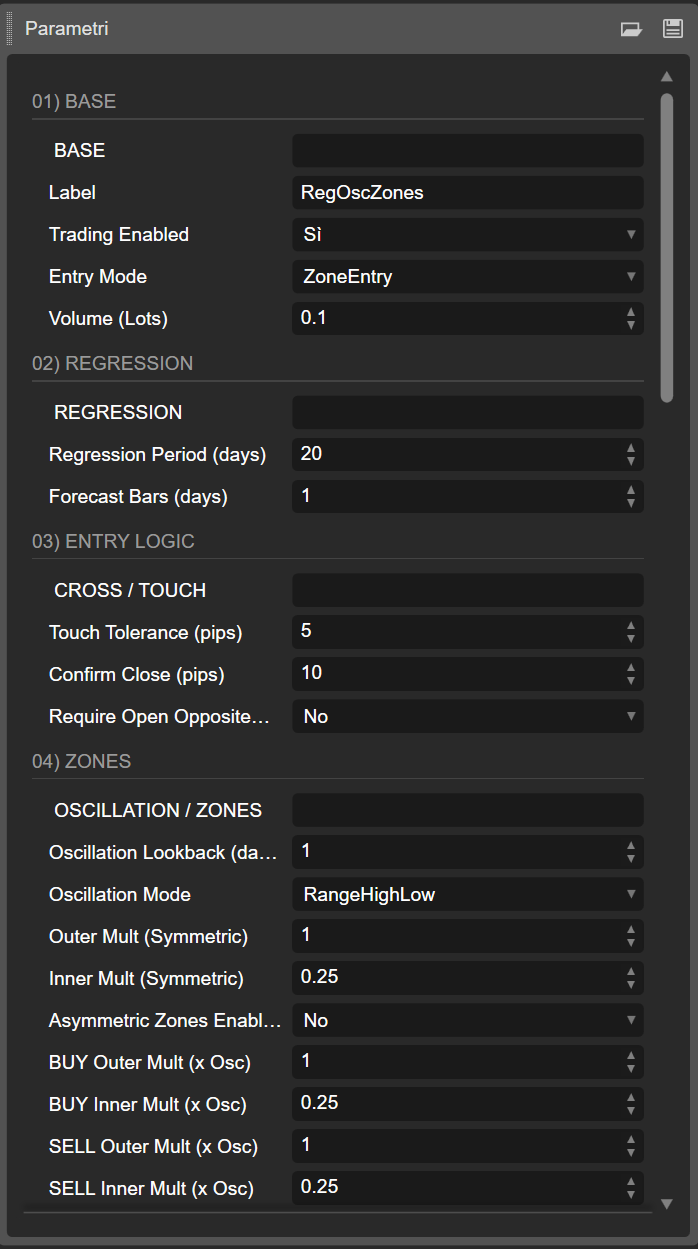
01) BASE 🧩
🔹 BASE (separator)
Cosmetic only: it’s just to visually separate parameters in the list.
🏷️ Label
Label used to identify positions opened by the bot.
👉 Important: the bot manages (BE/Trailing/close) only positions with this Label.
▶️ Trading Enabled
Turns ON/OFF new trade entries.
📌 Position management/risk may still run depending on your code, but it won’t open new trades.
🧭 Entry Mode
Selects the entry logic:
- 🟩 ZoneEntry: enters when price moves into the BUY/SELL zone
- ✳️ RegressionCrossClose: enters on “touch regression + confirmed close”
- ✅ CrossCloseWithZoneFilter: same as above, but also requires price to be inside the relevant zone
📦 Volume (Units) (or “Lots” if you’re using the converted version)
- In Units: set the volume directly in units (e.g., 10000)
- In Lots (recommended): set 0.01 / 0.05 / 0.10 etc., and the bot converts to units (and normalizes to broker min/step) 🎯
02) REGRESSION 📈
🔹 REGRESSION (separator)
🗓️ Regression Period (days)
Number of D1 bars used to calculate the linear regression.
📌 Higher = slower/more robust; lower = faster/more reactive.
🔮 Forecast Bars (days)
How many days forward to extend the regression for drawing/forecasting.
📌 Affects the projected line and the reference value used to build zones.
03) ENTRY LOGIC 🎯
🔹 CROSS / TOUCH (separator)
🎯 Touch Tolerance (pips)
Tolerance in pips to consider a regression “touch” valid.
👉 Prevents requiring tick-perfect touches.
✅ Confirm Close (pips)
How many pips beyond the regression the candle must close to confirm the signal.
📌 Helps reduce false “touch and reverse” signals.
↔️ Require Open Opposite Side
If enabled, requires the signal candle Open to be on the “correct” side of the regression.
📌 Extra filter for cleaner cross/touch signals.
04) ZONES 🟩🟥
🔹 OSCILLATION / ZONES (separator)
🕰️ Oscillation Lookback (days)
D1 lookback used to estimate oscillation (zone width base).
📌 Higher = more stable zones; lower = more reactive zones.
📐 Oscillation Mode
How oscillation is computed:
- 📏 RangeHighLow: max(High-Low) in the lookback
- 📊 TrueRange: max(TrueRange) in the lookback (includes gaps)
- 🧮 MaxDeviationFromRegression: maximum deviation of Close from the regression in the regression window
🌐 Outer Mult (Symmetric)
Outer multiplier for symmetric zones (maximum distance).
👉 Wider zones = deeper entries.
🟡 Inner Mult (Symmetric)
Inner multiplier (neutral band near regression).
📌 Higher inner = narrower valid zone (more selective).
⚖️ Asymmetric Zones Enabled
If ON, BUY/SELL zones can have different widths (above ≠ below). ✅
🟩 BUY Outer Mult / BUY Inner Mult
BUY zone width below regression:
- Outer = maximum distance
- Inner = minimum distance (closer to regression)
🟥 SELL Outer Mult / SELL Inner Mult
SELL zone width above regression:
- Outer = maximum distance
- Inner = minimum distance
🚧 Allow Beyond Outer
If ON, the zone becomes “open-ended”:
- BUY valid even below the outer limit
- SELL valid even above the outer limit
📌 Useful for aggressive mean reversion, but increases risk.
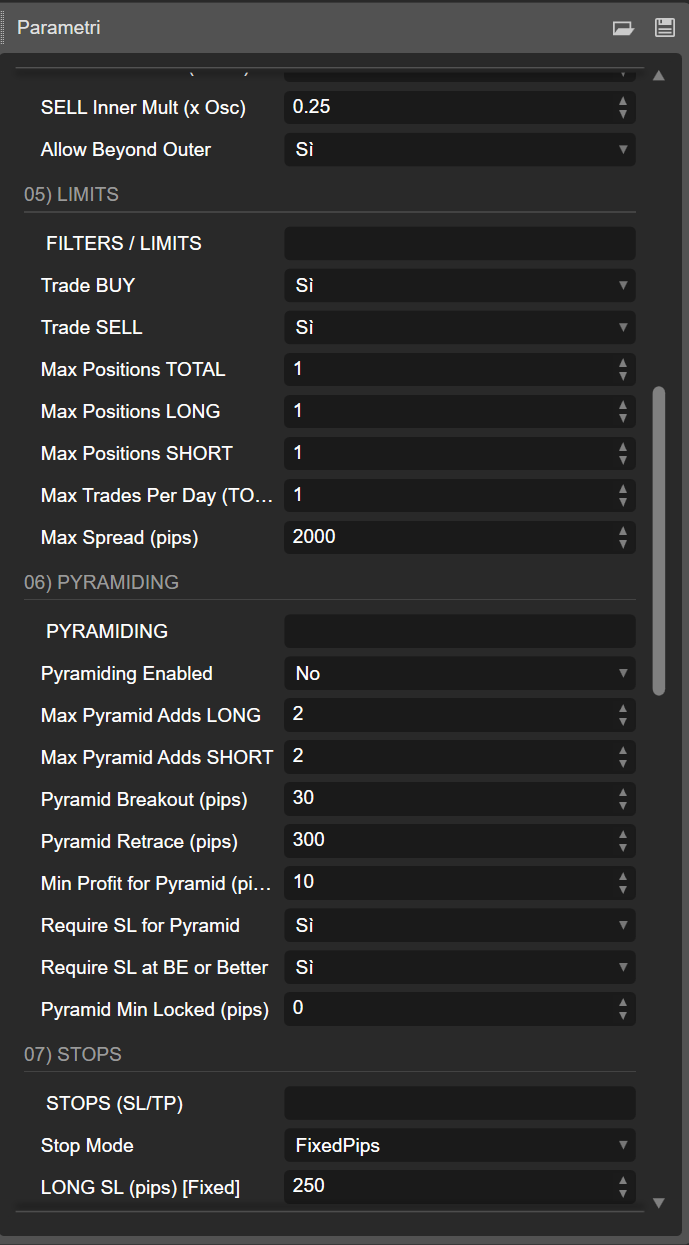
05) LIMITS 🧱
🔹 FILTERS / LIMITS (separator)
🟩 Trade BUY / 🟥 Trade SELL
Enable/disable long or short trading.
📌 Max Positions TOTAL
Maximum total simultaneous positions (bot’s symbol+label).
🟩 Max Positions LONG / 🟥 Max Positions SHORT
Side-specific maximum positions.
📅 Max Trades Per Day (TOTAL)
Maximum number of daily entries (buy+sell).
📌 Resets on new day (Server.Time.Date).
💧 Max Spread (pips)
If spread is above this value, the bot won’t open new trades.
06) PYRAMIDING 🧗
🔹 PYRAMIDING (separator)
🧗 Pyramiding Enabled
If ON, the bot can add positions in the direction of the move with controlled rules.
➕ Max Pyramid Adds LONG / SHORT
Maximum add-ons beyond the first position.
🚀 Pyramid Breakout (pips)
How far price must move in favor (from entry) to “arm” pyramiding.
🔙 Pyramid Retrace (pips)
After breakout, waits for a retracement of X pips, then adds (pullback entry).
💰 Min Profit for Pyramid (pips)
Base position must be at least X pips in profit before add-ons are allowed.
🛡️ Require SL for Pyramid
Requires the base position to have SL set before adding.
🧷 Require SL at BE or Better
Requires SL to be at break-even (or better) → more prop-friendly.
🔒 Pyramid Min Locked (pips)
Requires SL to lock at least BE + X pips before adding.
📌 Very conservative safety filter.
07) STOPS (SL/TP) 🛡️
🔹 STOPS (separator)
🧯 Stop Mode
- ❌ None: no automatic SL/TP
- 📌 FixedPips: fixed SL/TP, separate long/short
- 📐 OscMultiplier: SL/TP = oscillation * multiplier
🟩 LONG SL/TP (Fixed) & 🟥 SHORT SL/TP (Fixed)
Fixed pip values, separated by side.
📐 LONG/SHORT SL Mult & TP Mult (x Osc)
Multipliers applied to oscillation (converted to pips).
📌 Makes SL/TP adaptive to volatility.
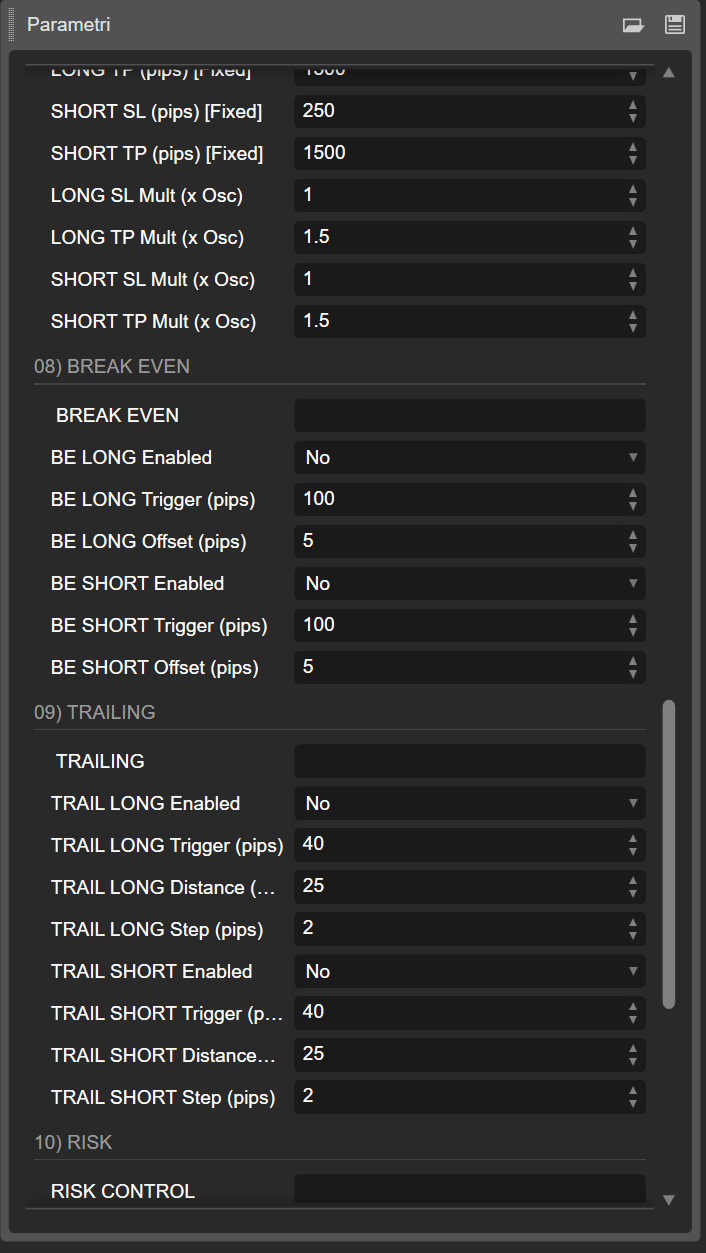
08) BREAK EVEN 🧷
🔹 BREAK EVEN (separator)
🟩 BE LONG Enabled / 🟥 BE SHORT Enabled
Enable BE per side.
🎯 BE Trigger (pips)
When profit exceeds X pips, BE triggers.
➕ BE Offset (pips)
Sets SL to Entry + offset (or Entry - offset for shorts).
📌 Helps cover costs/spread and lock minimal profit.
09) TRAILING 🪝
🔹 TRAILING (separator)
🟩/🟥 TRAIL Enabled
Enable trailing per side.
🎯 Trigger (pips)
Trailing starts only after X pips profit.
📏 Distance (pips)
Distance between current price and trailing SL.
👣 Step (pips)
Updates SL only if it improves by at least X pips → reduces excessive modifications.
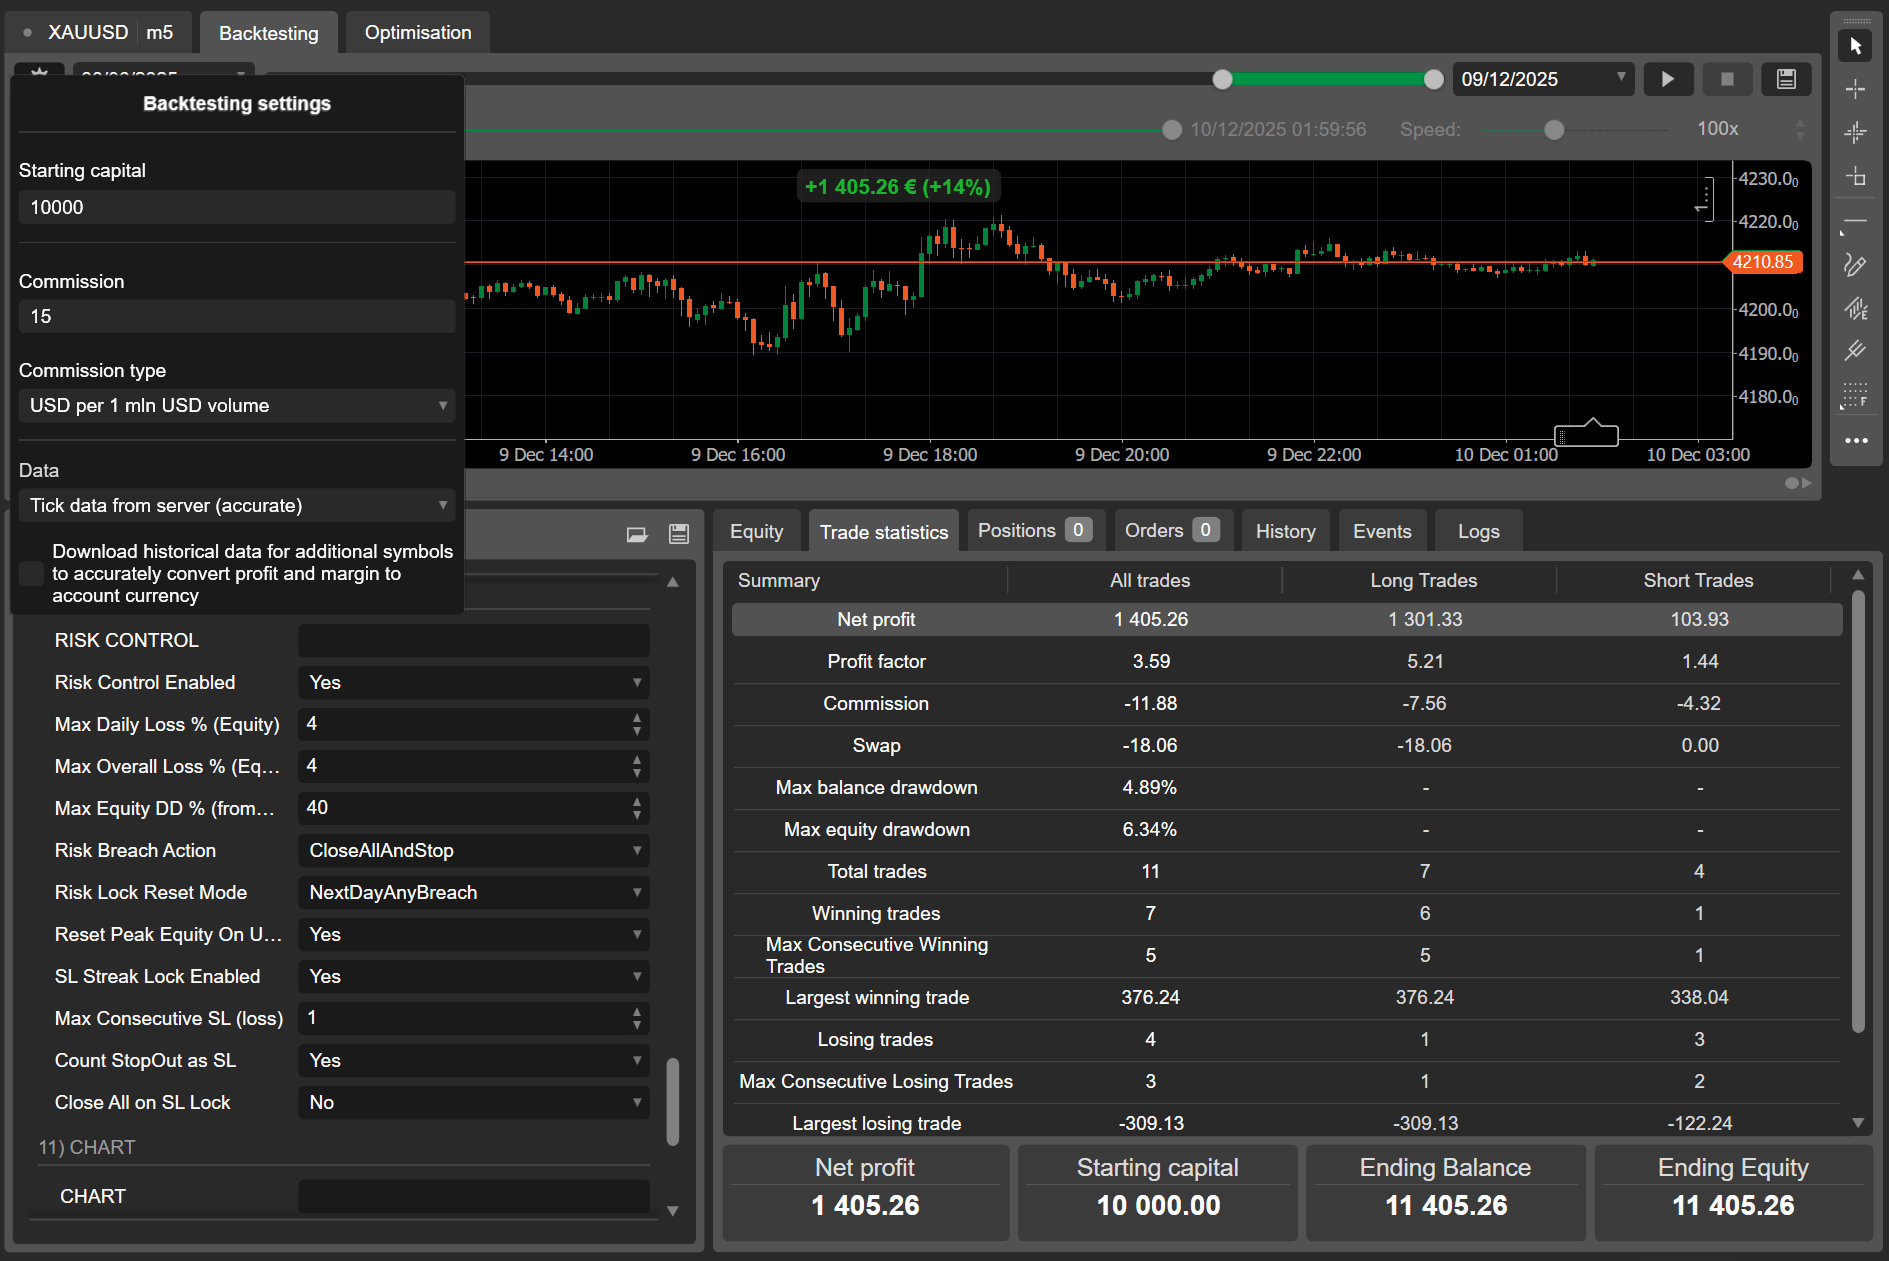
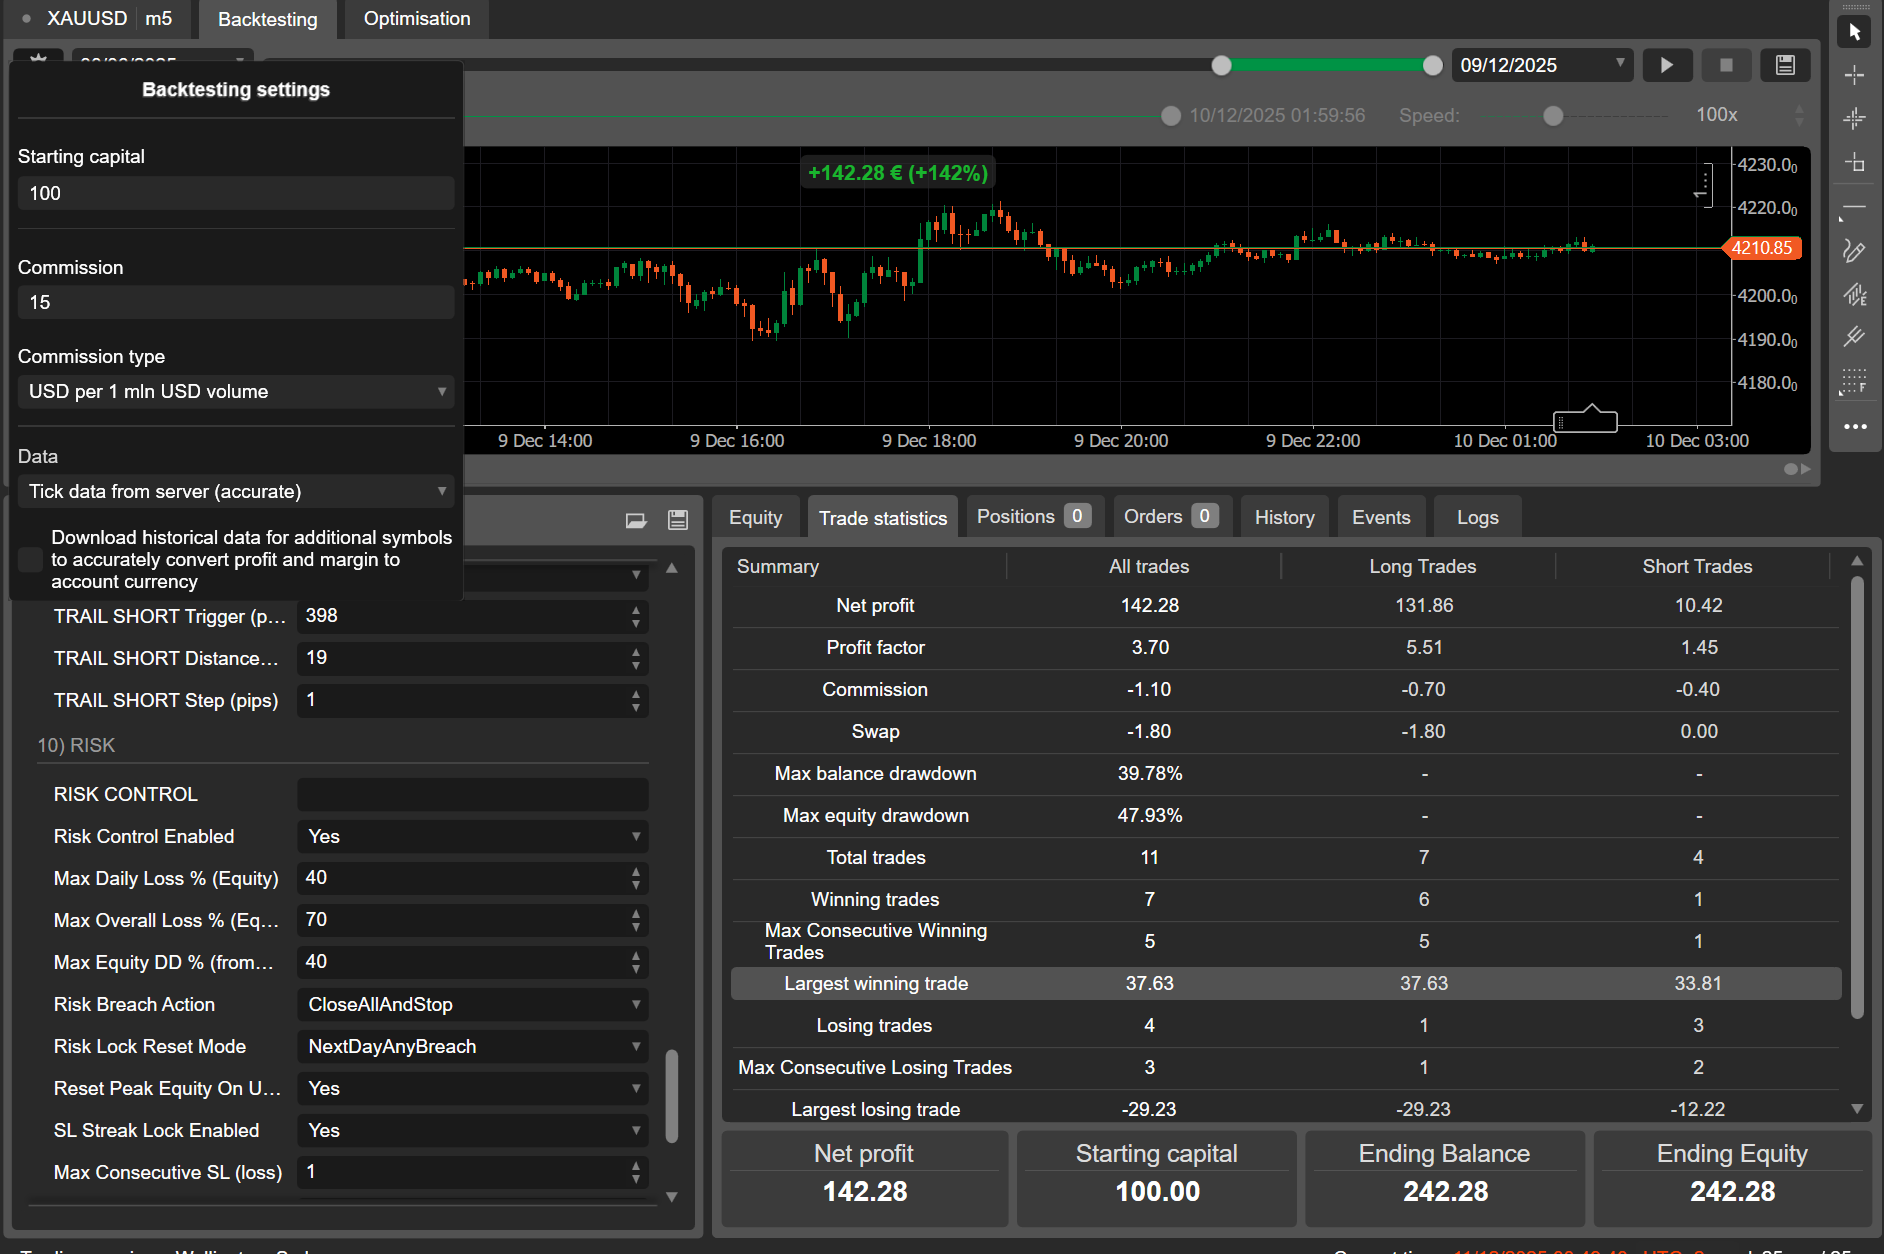
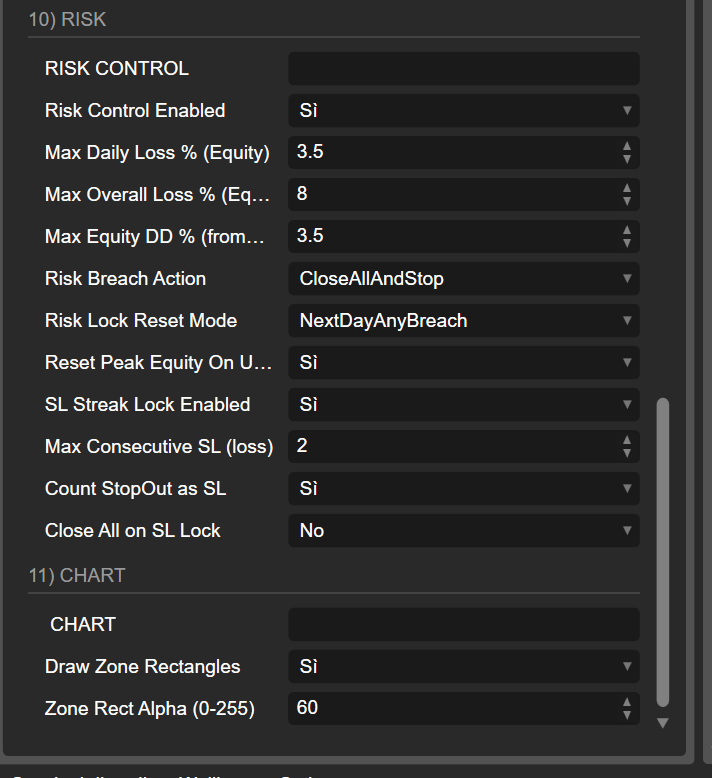
10) RISK 🔒🛑
🔹 RISK CONTROL (separator)
🧯 Risk Control Enabled
Enables equity-based risk rules.
📉 Max Daily Loss % (Equity)
Max daily loss relative to start-of-day equity.
🏦 Max Overall Loss % (Equity from Initial)
Max overall loss relative to initial equity when bot started.
⛰️ Max Equity DD % (from Peak)
Max drawdown from the highest equity peak reached during runtime.
🚨 Risk Breach Action
- 🛑 StopNewTrades: blocks new entries
- 🔥 CloseAllAndStop: closes all bot trades and locks
🔁 Consecutive Stop-Loss Lock (Prop-Style) 🧱🛑
✅ SL Streak Lock Enabled
Enables locking after N consecutive stop losses.
🔢 Max Consecutive SL (loss)
Max number of consecutive losing stop losses before locking.
🧨 Count StopOut as SL
Counts StopOut as stop loss too (useful with margin stop-outs).
🚪 Close All on SL Lock
If ON, when lock triggers it closes all bot positions.
📌 Typical behavior:
- counts only losing closes triggered by StopLoss (and optionally StopOut)
- once threshold is hit → blocks new entries until next day 🗓️🔒
- resets on new day (based on your daily reset logic)
11) CHART 🎨
🔹 CHART (separator)
🧱 Draw Zone Rectangles
Draws BUY/SELL zone rectangles on the chart.
🌫️ Zone Rect Alpha (0-255)
Rectangle transparency (0 = invisible, 255 = solid).
📌 The bot draws:
- 📈 Regression trendline (including forecast extension)
- ➖ Horizontal lines for BUY/SELL boundaries
- 🟩🟥 Zone rectangles (from first to last visible bar)
✅ Direct answer: “Entry logic = zones or only cross/touch?”
It depends on Entry Mode 🎯
- ZoneEntry = ZONE AREAS (zones)
- RegressionCrossClose = only regression cross/touch + confirmed close
- CrossCloseWithZoneFilter = cross/touch with zone filter ✅
- For the recommended parameter set (preset), directly from our profile page.