Açıklama
Midas Scalper: Hassas Altın Scalping
Midas Stratejisi, yalnızca Altın (XAUUSD) piyasası için özel olarak tasarlanmış, ızgara tarzı çok uzmanlaşmış bir scalping algoritmasıdır. Bu bot, sessiz, stabil ve aralıkta hareket eden koşullarda başarılı olur. Tamamen "küçük hedefle, küçük kaçır" felsefesi etrafında inşa edilmiştir—mikro düşüşleri satın alarak ve isteğe bağlı olarak mikro zirveleri satarak küçük, tutarlı kazançları titizlikle biriktirir, trailing stoplar ile karı kilitler ve önceden belirlenmiş bir kar hedefine ulaşıldığında otomatik olarak kapanır.
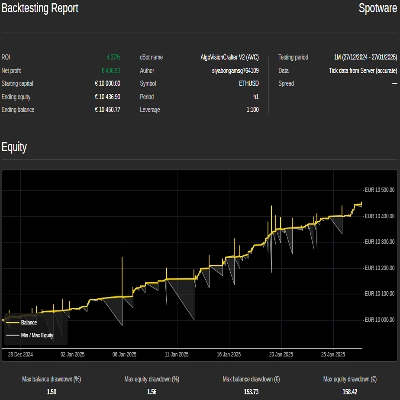
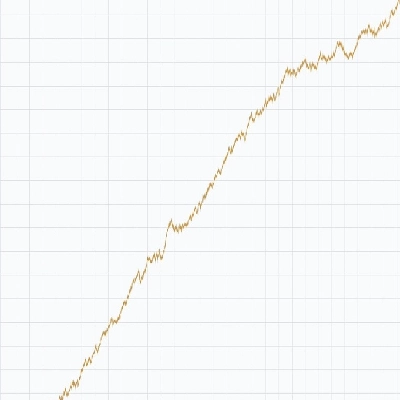
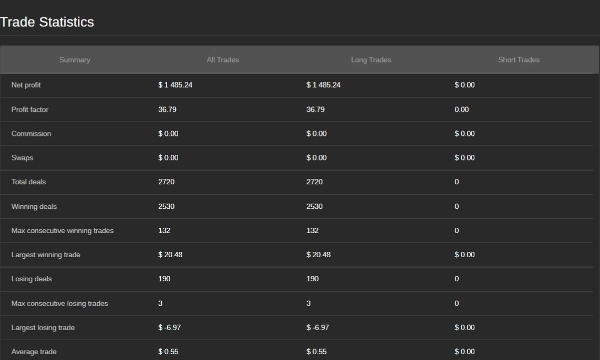
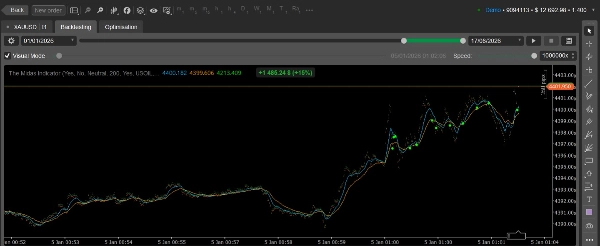
Performans ve Geri Test Sonuçları Bu algoritma titizlikle test edilmiştir. Sağlanan tarihsel tekrar raporuna dayanarak, cBot (testte "The Newer Midas" olarak adlandırılmıştır) XAUUSD sembolü üzerinde değerlendirilmiştir.
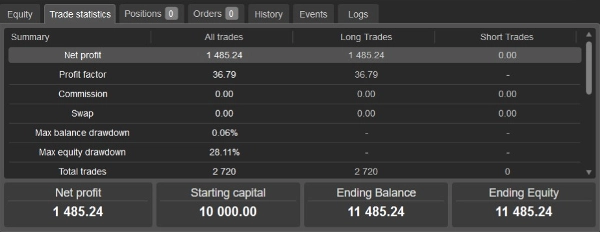
- Strateji için başlangıç sermayesi olarak 10.000 $ gerekmektedir.
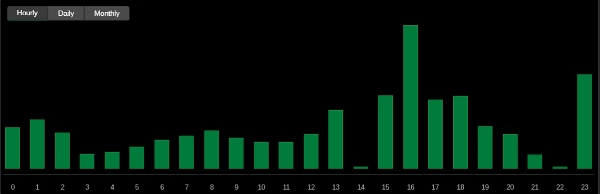
- Test süresi boyunca net 1485,24 $ kar elde edilmiştir.
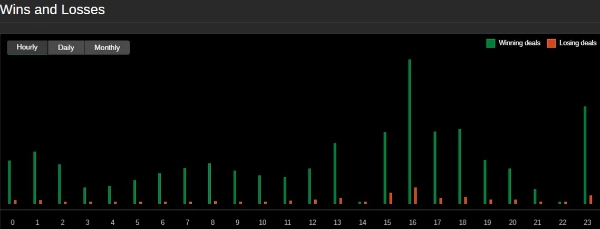
- Algoritma toplamda 2720 işlem gerçekleştirmiştir.
- Toplam işlemlerden 2530'u kazançlı işlemdir.
- Sistem, oldukça verimli bir kar faktörü olan 36.79.
- Test sırasında ulaşılan maksimum sermaye düşüşü %28.11.
⚠️ ÖNEMLİ PİYASA UYARILARI - KULLANMADAN ÖNCE OKUYUN
- Sermaye Gereksinimi: Bu bot, yüzen zararları güvenle karşılayabilmek için minimum 10.000 $ hesap bakiyesi gerektirir.
- Piyasa Koşulları: Bu bot stabil bir piyasa gerektirir. Altın ekonomik bir şok yaşarsa veya üssel, şiddetli fiyat hareketleri yaşanıyorsa, bu botu çalıştırmayın. Fırtınanın geçmesini bekleyin.
- Açgözlü Olmayın: Kar hedeflerinizi mütevazı tutun ve maksimum pozisyonlarınızı makul seviyede tutun. Bot, Altının ortalamasına dönmesine dayanır.
Bu beta sürümünün satışından elde edilen tüm gelirler doğrudan gelecekteki geliştirmeler ve gelişmiş AI entegrasyonlarının finansmanına yönlendirilir.
Parametrelerin Kullanımı (Kullanıcı Kılavuzu)
Midas Stratejisini güvenle kullanmak için temel modüllerinin nasıl yapılandırılacağını anlamalısınız. Standart scalping için varsayılan ayarlarla çalıştırabilir veya yalnızca büyük, 100 $ üzeri düşüşleri satın almak için ayarlayabilirsiniz.
Temel Ticaret Ayarları
- Hacim (Lot): Her bir işlem için pozisyon büyüklüğü. Bunu düşük tutun (örneğin, 0.01) çünkü bot birden fazla pozisyon açar.
- Kar Al: Her işlem için hedef çıkış noktası.
- Lock SL Tetikleyici ve Lock SL Seviyesi: Bu, bir trailing stop olarak işlev görür. Bir işlem "Tetikleyici" miktarı kadar karda olduğunda, Stop Loss kalıcı olarak "Lock Seviyesi"nde kara taşınır. Bu, kazanan işlemlerin kaybeden işlemlere dönüşmesini engeller.
- Hareket Eşiği (DipThresholdPips): Botun yeni bir işlem açmadan önce fiyatın son zirve/çukurdan ne kadar hareket etmesi gerektiği. Sadece büyük fiyat çöküşlerini satın almak istiyorsanız bunu yüksek bir sayıya çıkarın.
- Maksimum Açık Pozisyonlar: Botun tek yönde tutabileceği maksimum işlem sayısı. 100'e kadar izin verirken, hesap güvenliği için daha düşük bir sayı seçmeniz şiddetle tavsiye edilir.
- İşlemler Arası Minimum Zaman: Botun aynı fiyat seviyesinde çok fazla işlem açmasını önlemek için saniye cinsinden bir kısıtlama.
- Satış Izgarasını Etkinleştir: Varsayılan olarak bot sadece dipleri satın alır. Yerel zirvelerde piyasayı açığa satmak istiyorsanız bunu
Trueolarak değiştirin.
Kar Hedefleri ve Duraklatma
- Kar Hedefi ($): Ticaret oturumunuz için nihai hedef. Toplam kazancınız bu dolar miktarına ulaştığında, bot yeni işlemler açmayı durdurur. Şu anda karda olan tüm işlemleri hemen kapatır ve zarar eden işlemlerin bireysel olarak kara dönene kadar açık kalmasına sabırla izin verir.
- Hedef Sonrası Otomatik Devam: Eğer
Falseise, bot hedefi gerçekleştirdikten sonra tamamen kapanır. EğerTrueise, dinlenir ve yeni bir döngü başlatır. - Sonraki Hedef Aşamasından Önce Dinlenme: Otomatik devam etkinse, botun bir sonraki döngüsüne başlamadan önce kaç saat dinleneceğini belirler.
Risk Yönetimi (Kill Switchler)
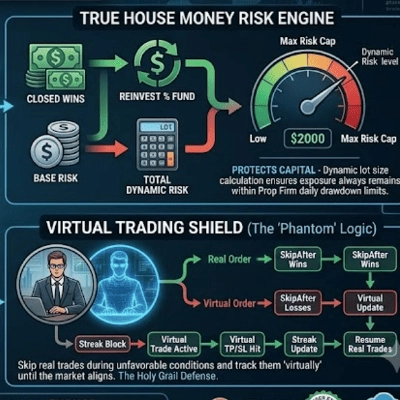
- Sermaye Taban Koruması: Nihai güvenlik ağı. Minimum toplam P&L dolar miktarını ayarlayın. Toplam strateji P&L bu tabanın altına düşerse, bot en kötü kaybeden pozisyonu tik tik dinamik olarak kapatır ve tabanın üzerine çıkana kadar devam eder. 0 $ tabanı, botun başlangıç sermayenizi asla riske atmayacağı anlamına gelir—sadece kazanılmış karı riske eder.
- Tehlike Bölgesi Salınımı ve Penceresi: Erken uyarı volatilite detektörü. Piyasa çok kısa sürede (Dakika) çok fazla (Pip) hareket ederse, küçük zararı olan işlemleri savunma amaçlı kapatır ve işlem yapmayı soğuma süresi için duraklatır.
- Sert Kill Switch: Aşırı piyasa şokları için son çare. Büyük, şiddetli hareketle tetiklenirse, bot tüm pozisyonları anında tasfiye eder—kazançlı ya da zararlı fark etmez—ve piyasanın stabil hale gelmesi için çok günlük bir dinlenme süresi zorunlu kılar.
Bu kılavuz, Midas Grid Stratejisi cBotunun operasyonel mekaniklerini, risk yönetimi katmanlarını ve parametre yapılandırmalarını detaylandırır.
Altın (XAUUSD) gibi volatil varlıklar için tasarlanmış bu algoritma, sermaye korumasını mutlak öncelik olarak alan çift yönlü bir ızgara scalperdır. Basit stop-losslara dayanmak yerine, dinamik kar kilitleme, aşırı volatilite için yumuşak ve sert kill switchler ve günlük/haftalık hedeflere ulaşmak için yönetilen bir kapanış protokolü kullanır.
1. Temel İşletim Prensipleri
- İşlem Mantığı: İzlenen yüksekten lokal dipleri satın alır ve izlenen düşükten lokal zirveleri satar.
- Slipaj Kontrolü:
MarketRangeemirleri kullanır. Likidite azaldığında ve broker emri tam pip toleransınız içinde dolduramazsa, emir kötü bir fiyattan girmek yerine reddedilir. - Durum Sürekliliği: Bot, gerçekleşmiş karını, düşüş limitlerini ve soğuma zamanlayıcılarını yerel depolamaya kaydeder. cTrader çökerse veya VPS'nizi yeniden başlatırsanız, tam olarak kaldığı yerden devam eder.
2. Parametre Referans Kılavuzu
Her parametre tam olarak cTrader UI gruplarına eşlenmiştir.
Genel
- Hacim (Lot): Her bir işlem için temel pozisyon büyüklüğü (Hem Alış hem Satış). Pozisyon büyüklüğü, tahmin edilebilir ızgara risk ölçeklemesi için statiktir.
Alış Ayarları
Dip satın alma mantığını kontrol eder. Bunlar Satış tarafından tamamen bağımsız çalışır.
- Alış Kar Al (Pip): Her alış emri için sert broker tarafı kar al seviyesi.
- Alış Stop Loss (Pip): Sert broker tarafı stop loss. Bu mutlak bir "felaket" durdurmasıdır ve botun iç tehlike bölgesi limitlerinin dışında (örneğin, 400+ pip) olmalıdır. Ani sunucu bağlantı kopmalarına karşı koruma sağlar.
- Alış Lock SL Tetikleyici (Pip): Botun kar-kilit stop loss'u güvence altına alması için pozisyonun ulaşması gereken yüzen kar miktarı.
- Alış Lock SL Seviyesi (Pip): Tetiklendikten sonra stop loss'un yerleştirildiği yer. (Örnek: Tetikleyici 25, Seviye 20 = kar 25 pip'e ulaştığında, SL +20 pip'e taşınır, kar kilitlenir).
- Alış Dip Eşiği (Pip): Yeni alış tetiklemek için izlenen zirveden (ilk işlem için) veya en düşük açık alış pozisyonundan (sonraki ızgara işlemleri için) gereken fiyat düşüşü.
- Maksimum Alış Pozisyonları: Eşzamanlı açık alış işlemlerinin sert sınırı.
Satış Ayarları
Zirve satış mantığını kontrol eder.
- Satış Izgarasını Etkinleştir: Kısa tarafı açar/kapatır. Varsayılan olarak devre dışıdır.
- Satış Kar Al / Stop Loss (Pip): Kısa işlemler için sert broker tarafı limitler.
- Satış Lock SL Tetikleyici / Seviyesi (Pip): Kısa işlemler için kar kilitleme mekanizması.
- Satış Yükseliş Eşiği (Pip): Yeni kısa işlem tetiklemek için izlenen çukurdan (veya en yüksek açık satıştan) gereken fiyat yükselişi.
- Maksimum Satış Pozisyonları: Eşzamanlı açık satış işlemlerinin sınırı.
İşlem Zamanlaması
- İşlemler Arası Minimum Zaman (Saniye): Yüksek frekanslı yürütme için bir kısıtlama. Piyasa tiklerinin aynı mikro saniyede birden fazla ızgara girişi tetiklemesini önler. Kapanış emirlerini kısıtlamaz.
Oturum Filtresi
Yüksek likiditesi olmayan veya öngörülemez saatlerde yeni girişleri engeller. Açık işlemler normal şekilde yönetilmeye ve kapatılmaya devam eder.
- Oturum Filtresini Etkinleştir: Zaman bazlı yürütmeyi açar/kapatır.
- Oturum Başlangıç / Bitiş Saati (UTC, 0-23): Operasyonel pencere. Mantık otomatik olarak sarma pencerelerini destekler (örneğin, 22'den 1'e doğru 22:00 - 01:00 anlamına gelir).
Yürütme
- Maksimum Kabul Edilebilir Slipaj (Pip): Market Range emrini sınırlar. Broker, talep edilen fiyattan daha kötü bir mesafede emri doldurmaya çalışırsa, bot girişi reddeder.
- Maksimum Kabul Edilebilir Spread (Pip): Canlı spread monitörü. Spread bu sınırın üzerine çıkarsa (genellikle büyük haber olayları veya rollover sırasında), bot yeni girişleri likidite dönene kadar askıya alır.
Kar Hedefi
Yönetilen bir hedef sistemi. Ulaşıldığında, bot tüm ızgarayı zorla kapatmak yerine "Kapanış" aşamasına girer.
- Kar Hedefi ($): Hedeflenen dolar miktarı (gerçekleşmiş + yüzen kar toplamı).
- Hedef Sonrası Otomatik Devam: Eğer doğruysa, bot belirli bir süre dinlenir ve sonra yeni bir döngü başlatır. Yanlışsa, bot kalıcı olarak durur ve manuel yeniden başlatmanızı bekler.
- Sonraki Hedef Aşamasından Önce Dinlenme (Saat): Botun tekrar işlem yapmaya başlamadan önce bekleyeceği soğuma süresi (Otomatik Devam etkin olmalıdır).
Kapanış Mekaniği: Hedefe ulaşıldığında, yeni girişler durur. Bot, şu anda karda olan pozisyonları hemen kapatır. Negatif pozisyonları ise piyasa kendi karına dönene veya kendi stop losslarına ulaşana kadar açık bırakır. Izgara temizlendiğinde, dinlenme dönemi başlar.
Sermaye Taban Koruması
Nihai algoritmik sermaye korumanız. Toplam strateji P&L'yi izler (manuel işlemleri veya aynı hesapta diğer botları dikkate almaz).
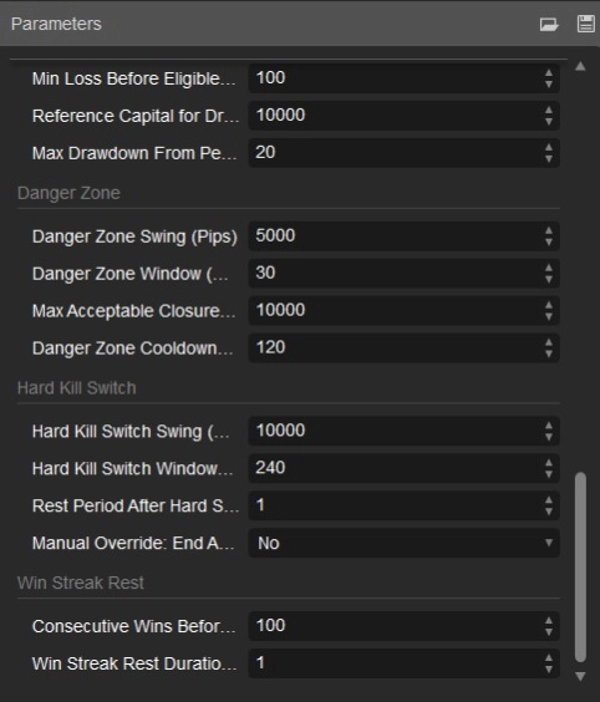
- Sermaye Tabanı - Minimum Toplam P&L ($): Mutlak dolar tabanı. 0 $ olarak ayarlanırsa, bot stratejinin başlangıç sermayesinde net negatif olmasına asla izin vermez—sadece önceden kazanılmış karı riske eder.
- Uygun Olmadan Önce Minimum Zarar (Pip): Botun, normal spread kaynaklı yüzen zararı gösteren yeni işlemleri kapatmasını engeller. Bir işlemin acil kesim için uygun olabilmesi için en az bu kadar pip zarar etmesi gerekir.
- Referans Sermaye (%): Bu özel bot için başlangıç tahsisatınız.
- Zirveden Maksimum Düşüş (%): Strateji en yüksek tarihsel zirvesinden bu yüzde kadar düşerse koruma tetiklenir.
Nasıl davranır: Eğer aşılırsa, bot tüm yeni girişleri engeller ve tek en kötü uygun kaybedeni keser. Sonraki tikte tekrar kontrol eder. Bu, panik kapatmaktan ziyade kanama durdurucu işlev görür.
Tehlike Bölgesi
Piyasa temizliği için erken işaretleri yakalamak üzere tasarlanmış yumuşak bir volatilite detektörü.
- Tehlike Bölgesi Salınımı (Pip): Savunma duruşunu tetiklemek için gereken fiyat salınımı büyüklüğü.
- Tehlike Bölgesi Penceresi (Dakika): Salınımı hesaplamak için geriye dönük süre.
- Maksimum Kapanış Zararı (Pip): Yumuşak kapanış eşiği. Tehlike Bölgesi tetiklenirse, bot kaybı daha az olan pozisyonları hemen kapatır (küçük zararları erken keser) ancak büyük zararları kilitlememek için ağır pozisyonları açık bırakır.
- Tehlike Bölgesi Soğuma Süresi (Dakika): Botun yeni girişlere izin vermeden önce piyasanın sakinleşmesini beklediği süre.
Sert Kill Switch
Kara kuğu olayları için nükleer seçenek. Kar Hedefi kapanış dahil her şeyi geçersiz kılar.
- Sert Kill Switch Salınımı (Pip): Tetiklenmek için gereken şiddetli fiyat hareketi.
- Sert Kill Switch Penceresi (Dakika): Geriye dönük süre.
- Sert Durdurma Sonrası Dinlenme Süresi (Gün): Uzun süreli ceza kutusu.
- Manuel Geçersiz Kılma (Aktif Sert Durdurma Dinlenmesini Şimdi Bitir): Bir güvenlik anahtarı. Bot durumunu hatırladığı için, durdurulan bir botu yeniden başlatmak Sert Kill zaman aşımını atlamaz. Bu kutuyu işaretlemeli, botu yeniden başlatmalı ve sonra işareti kaldırmalısınız.
Kazanç Serisi Dinlenmesi
- Dinlenmeden Önce Ardışık Kazançlar: Botun nefes alması için kapatılan ardışık kazançlı işlem sayısı (Alış ve Satış birlikte).
- Kazanç Serisi Dinlenme Süresi (Dakika): Botun, tükenmiş bir trendin tam tepesine hızla girmesini önlemek için yürütmeyi duraklatır.
3. Operasyonel İş Akışı
Her gelen fiyat tikinde, bot mantığı tam olarak bu hiyerarşide işler. 1. adımda bir tetikleme, 2. adımın değerlendirilmesini engeller.
- Durum Yükleme: Yerel belleği kontrol eder (soğuma süresinde mi? kapanışta mı?).
- Sert Kill Switch: Piyasa çöküyor mu? Evet ise -> her şeyi tasfiye et, dur.
- Sermaye Taban Koruması: Sermaye eğrisi yapısını mı bozuyor? Evet ise -> girişleri engelle, en kötü kaybedeni kes.
- Kar Hedefi: Bugün yeterince para kazandık mı? Evet ise -> girişleri engelle, kazananları topla.
- Tehlike Bölgesi / Kazanç Serisi: Yumuşak bir zaman aşımında mıyız? Evet ise -> bekle.
- Çevre Filtreleri: Spread çok mu geniş? Oturum kapalı mı? Evet ise -> bekle.
- Yürütme Mantığı: Fiyat eşik değerini aştıysa -> MarketRange girişi gönder.
GÜNCELLENMİŞ Grafik Ayarları
- Sembol: XAUUSD
- Periyot: m1 (1 dakikalık grafik)
Genel ve İşlem Zamanlaması
- Başlangıç Sermayesi: 10.000,00 $ (Bu, Referans Sermaye parametresiyle matematiksel olarak eşleşecek şekilde cTrader'da ayarlanmalıdır)
- Lot Cinsinden Hacim: 0.01
- İşlemler Arası Minimum Saniye: 0.0
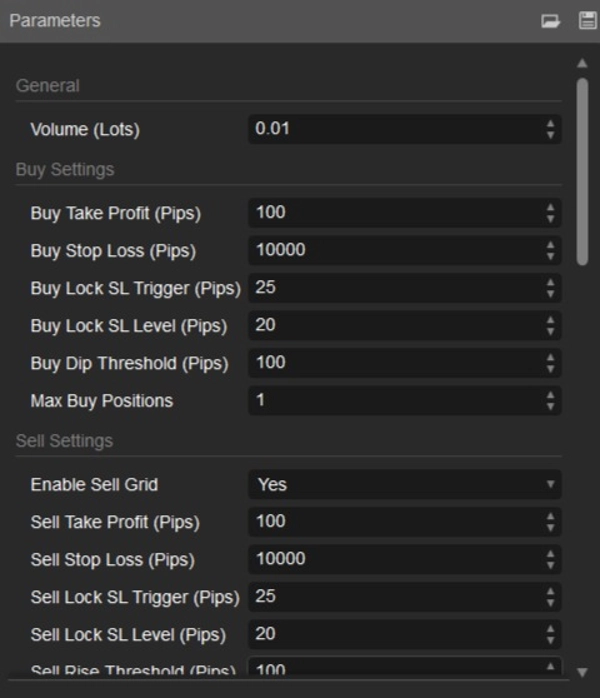
Alış Ayarları
- Alış Kar Al: 100,0 pip
- Alış Stop Loss: 10000,0 pip
- Alış Lock Tetikleyici: 25,0 pip
- Alış Lock Seviyesi: 20,0 pip
- Alış Dip Eşiği: 100,0 pip
- Maksimum Alış Pozisyonları: 1
Satış Ayarları
- Satış Izgarasını Etkinleştir: true
- Satış Kar Al: 100,0 pip
- Satış Stop Loss: 10000,0 pip
- Satış Lock Tetikleyici: 25,0 pip
- Satış Lock Seviyesi: 20,0 pip
- Satış Yükseliş Eşiği: 100,0 pip
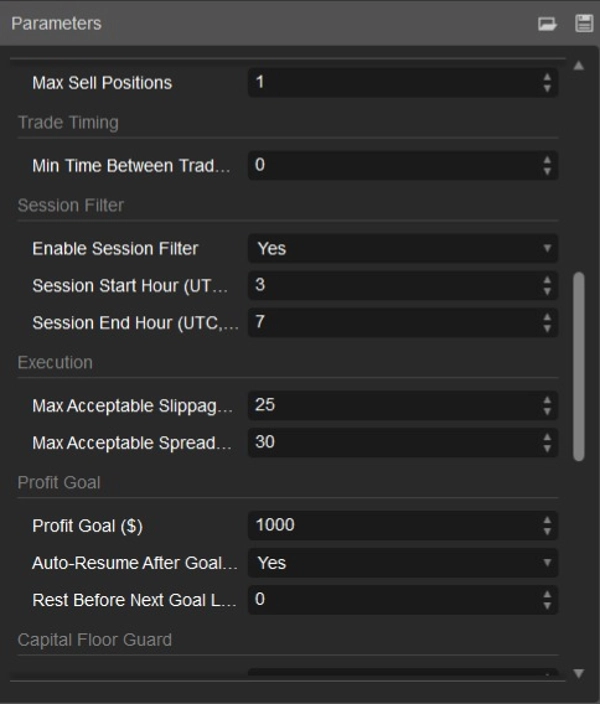
- Maksimum Satış Pozisyonları: 1
Yürütme ve Filtreler
- Oturum Filtresini Etkinleştir: true
- Oturum Başlangıç Saati (UTC): 3
- Oturum Bitiş Saati (UTC): 7
- Maksimum Slipaj: 25,0 pip
- Maksimum Spread: 30,0 pip
Kar Hedefi
- Kar Hedefi: 1000,0 $
- Hedef Sonrası Otomatik Devam: true
- Hedef Dinlenme Saatleri: 0,0
Sermaye Taban Koruması
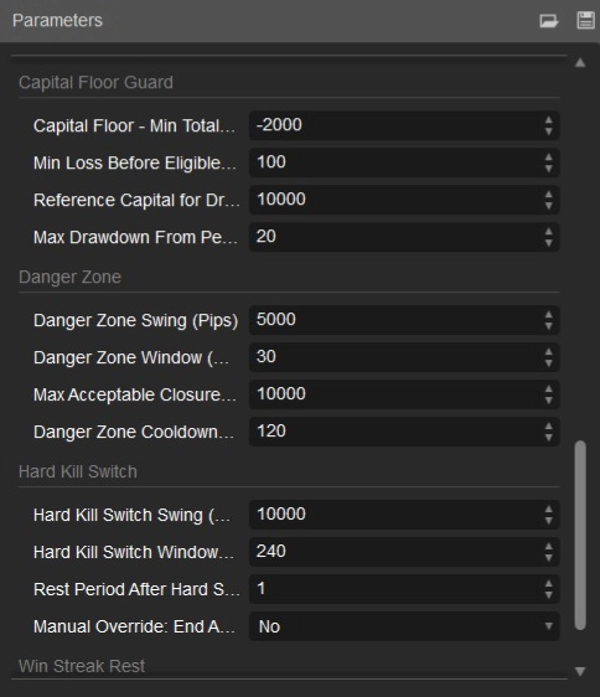
- Sermaye Tabanı: -2000,0 $
- Koruma İçin Minimum Zarar Pip: 100,0 pip
- Referans Sermaye: 10000,0 $
- Zirveden Maksimum Düşüş: %20,0
Tehlike Bölgesi
- Tehlike Bölgesi Salınımı: 5000,0 pip
- Tehlike Bölgesi Penceresi: 30 dakika
- Maksimum Kapanış Zararı: 10000,0 pip
- Tehlike Bölgesi Soğuma Süresi: 120 dakika
Sert Kill Switch
- Sert Durdurma Salınımı: 10000,0 pip
- Sert Durdurma Penceresi: 240 dakika
- Sert Durdurma Dinlenme Günleri: 1,0
- Sert Durdurma Dinlenmesini Geçersiz Kıl: false
Kazanç Serisi
- Kazanç Serisi Dinlenme Sayısı: Botun dinlenmeye geçmeden önce kapattığı ardışık kazanan işlem sayısı.
- Kazanç Serisi Dinlenme Dakikası: Botun, tükenmiş bir trendin tam tepesine hızla girmesini önlemek için yürütmeyi duraklatma süresi.
Kullanıcılar için Anahtar Parametre Hızlı Referansı:
- Trailing Lot Ölçeklendirme:
EnableTrailingLotScalingetkinleştirin, kar adımınıReferans Sermaye ($)cinsinden tanımlayın ve lot artışlarınıReferans Lotlarile ayarlayın. - Sakin Saatler Stratejisi:
EnableDeadZoneveEnableAsianSession'u true olarak tutun,EnableLondonNyOverlap'u ise false yaparak girişleri daha düşük volatiliteye sahip piyasa pencereleriyle sınırlayın.
Özet
Key features include dynamic profit-locking, soft and hard kill switches for extreme volatility, and a managed wind-down protocol to safely close positions upon reaching profit goals. It supports dual-directional trading with configurable buy and sell grids, allowing users to adjust parameters such as trade volume, take profit, stop loss, dip/rise thresholds, maximum open positions, and timing controls.
Risk management tools include a capital floor guard that prevents net losses on starting capital, a danger zone volatility detector that pauses trading during sudden market swings, and a hard kill switch that liquidates all positions during extreme market shocks. The bot also features session filters to restrict trading to specific hours and slippage/spread controls to ensure order quality.
Backtested on a $10,000 starting capital, it demonstrated a net profit of $1,485.24 over 2720 trades with a profit factor of 36.79 and a maximum drawdown of 28.11%. The bot saves its state locally to maintain continuity after restarts or crashes. It is intended for use with a minimum account balance of $10,000 and a 1-minute chart timeframe.