
انحياز هيكل هيكين آشي (مؤشر cTrader)
مناطق العرض والطلب التلقائية مع انحياز متعدد الأطر الزمنية.
ما يفعله – باللغة الإنجليزية البسيطة
يقوم هذا المؤشر تلقائيًا بـ:
- قراءة حركة سعر هيكين آشي واكتشاف تحولات محورية ذات معنى.
- بناء مناطق دعم ومقاومة ديناميكية حول تلك المحاور، باستخدام كل من طرف الفتيل وجسم الشمعة (وليس مجرد خطوط عشوائية).
- دمج المناطق القريبة بذكاء بحيث ترى مستويات نظيفة وقابلة للتداول بدلاً من غابة من الخطوط الأفقية.
- توليد انحياز صعودي أو هبوطي واضح كلما اخترق السعر بالكامل أحدث منطقة دعم أو مقاومة.
- يعرض لك الانحياز لـ:
-
- الإطار الزمني للمخطط الخاص بك، و
- إطار زمني أعلى اختياري (الافتراضي H2) — دون رسم فوضى HTF على مخططك.
النتيجة: نظرة واحدة تخبرك أين المستويات الحقيقية وما إذا كان السوق حاليًا يميل صعودًا أو هبوطًا.
المشكلة التي يحلها
معظم المتداولين لديهم نفس المشاكل:
- خطوط الدعم/المقاومة المرسومة يدويًا هي:
-
- ذاتية،
- غير متسقة،
- وغالبًا ما تكون مبالغًا فيها.
- مؤشرات “الزجزاج + الخط الأفقي” البسيطة:
-
- لا تتعامل بشكل صحيح مع عرض المنطقة،
- تكدس المستويات فوق بعضها البعض،
- أو تمدد المناطق بحيث تغطي نصف المخطط.
- الانحياز غالبًا ما يكون “في رأسك” – وليس شيئًا يمكنك رؤيته بوضوح أو استخدامه بطريقة قائمة على القواعد.
تم بناء هذا المؤشر لـ:
- تحويل هيكل هيكين آشي إلى مناطق واضحة وموضوعية،
- منحك اتجاه/انحياز قائم على القواعد بناءً على تلك المناطق،
- مع الحفاظ على المخطط نظيفًا وقابلًا للقراءة.
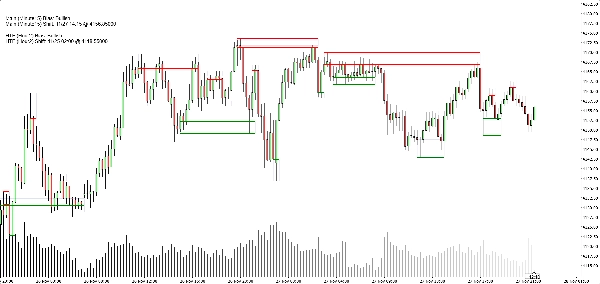
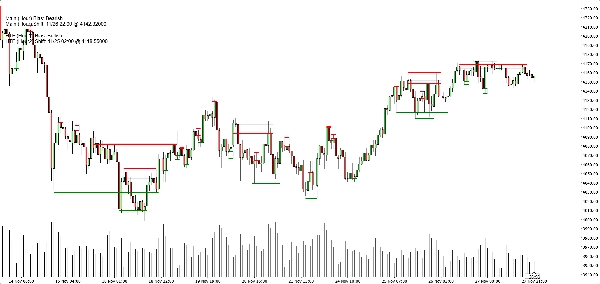
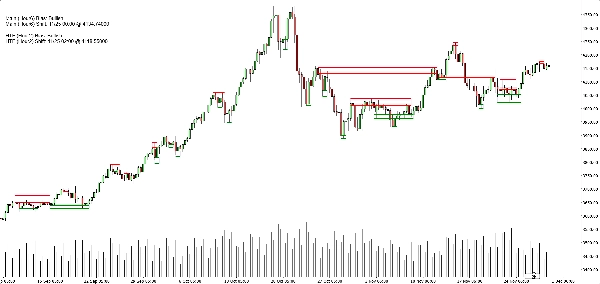
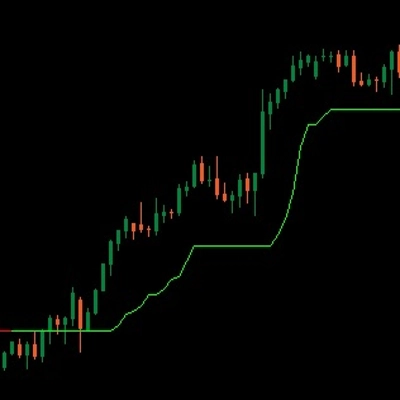
كيفية بناء المناطق (شرح صديق للمتداول)
لكل محور هيكين آشي، ينظر المؤشر إلى هيكل مكون من 3 شموع:
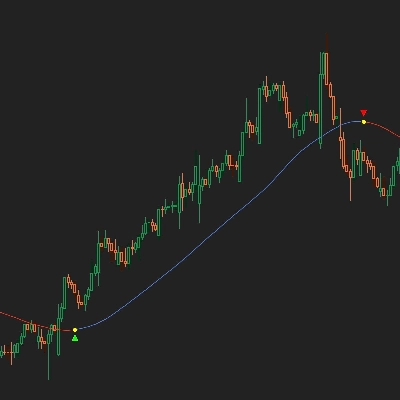
- عندما يتحول HA من الأحمر إلى الأخضر، فإنه يشير إلى محور دعم.
- عندما يتحول HA من الأخضر إلى الأحمر، فإنه يشير إلى محور مقاومة.
ثم يبني المنطقة:
مناطق الدعم
- يجد أدنى فتيل بين الشموع الثلاث (الحد الأقصى الحقيقي).
- يجد أدنى قاع تالي لا يزال أعلى من ذلك الحد الأقصى.
- يستخدم جسم الشمعة (الافتتاح/الإغلاق) بالقرب من ذلك القاع الداخلي لتعريف الجانب “القابل للتداول” من المنطقة.
- منطقة الدعم النهائية:
-
- القاع = أدنى فتيل،
- القمة = مستوى داخلي قائم على الجسم.
مناطق المقاومة
- يجد أعلى فتيل بين الشموع الثلاث.
- يجد أعلى قمة تالية لا تزال أقل من ذلك الحد الأقصى.
- يستخدم الجسم بالقرب من تلك القمة الداخلية.
- منطقة المقاومة النهائية:
-
- القمة = أعلى فتيل،
- القاع = مستوى داخلي قائم على الجسم.
لذا كل منطقة ليست مجرد نطاق عشوائي:
إنها نطاق من الفتيل إلى الجسم يمثل المكان الذي رفض أو انعكس فيه السعر فعليًا.
منطق الدمج (لماذا يبقى المخطط نظيفًا)
مناطق من نفس النوع (دعم مع دعم، مقاومة مع مقاومة):
- تُعامل كوحدات على خط زمني.
- يمكن دمجها فقط إذا تداخلت فعليًا في السعر.
- الدمج هو بشكل صارم محلي:
-
- يمكن للمنطقة الجديدة أن تندمج مع:
-
- أحدث منطقة (متتالية)، أو
- ثاني أحدث منطقة (+1 فجوة)، و
- دمج “مرساة” إضافية خلف ذلك إذا كانت المنطقة المدمجة الجديدة الآن تتداخل مع الهيكل السابق.
هذا يحافظ على السلوك بديهيًا:
- المناطق لا “تبتلع” التاريخ بأكمله.
- يتم احترام المستويات الأقدم ولكن لا يُسمح لها بإنشاء مناطق عملاقة ضخمة.
- يتم التعامل مع الهيكل المحلي مثل A–B–C أو A–C+D بطريقة محكمة.
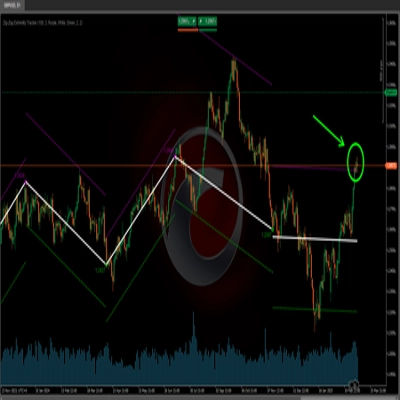
منطق الانحياز (كيف تتداول به فعليًا)
لكل إطار زمني (الرئيسي وHTF):
- يتتبع المؤشر أحدث منطقة دعم مدمجة و أحدث منطقة مقاومة مدمجة.
- ثم، في كل شمعة مغلقة:
-
- إذا أغلق السعر فوق أحدث منطقة مقاومة → يصبح الانحياز صعوديًا.
- إذا أغلق السعر أسفل أحدث منطقة دعم → يصبح الانحياز هبوطيًا.
يخزن:
- ال وقت آخر تغيير في الانحياز،
- مستوى السعر الذي اخترق فيه السعر المنطقة.
على المخطط، يعرض لوحة نص صغيرة:
الانحياز الرئيسي (H1): صعوديتغيير رئيسي (H1): 11/26 15:00 @1.08750
إذا تم تمكين HTF، سترى أيضًا شيئًا مثل:
انحياز HTF (H2): هبوطيتغيير HTF (H2): 11/25 08:00 @1.09200
يمكنك أيضًا تمكين تنبيه صوتي عند تغير انحياز الإطار الزمني الرئيسي.
ما تراه على المخطط
- مناطق الدعم:
-
- خطوط قاعدة/محفز أفقية خضراء (اختياري)،
- مستطيل ناعم بلون كحلي خفيف جدًا يُظهر نطاق الدعم الكامل.
- مناطق المقاومة:
-
- خطوط حمراء + مستطيل ناعم كحلي للنطاق.
- خيارات عرض نظيف:
-
- إظهار/إخفاء مناطق الدعم،
- إظهار/إخفاء مناطق المقاومة،
- تشغيل/إيقاف المستطيلات المملوءة،
- تشغيل/إيقاف خطوط القاعدة/المحفز،
- تشغيل/إيقاف لوحة الانحياز.
هذا يتيح للمتداولين المختلفين الاختيار بين:
- مظهر أكثر تبسيطًا (ربما مجرد مستطيلات)، أو
- رؤية أكثر دقة (خطوط دقيقة مرئية).
حالات الاستخدام النموذجية
يمكنك وضعه كأداة مفيدة لـ:
- تصفية الاتجاه
-
- البحث فقط عن عمليات شراء عندما يكون كلا انحياز الإطار الزمني الرئيسي وHTF صعوديًا.
- البحث فقط عن عمليات بيع عندما يكون كلاهما هبوطيًا.
- دخول المناطق
-
- استخدام المناطق كـ مناطق اهتمام لـ:
-
- أوامر محدودة،
- دخول تأكيدي (مثلاً، عودة السعر إلى منطقة مكسورة ويرفضها مرة أخرى)،
- وضع وقف يتجاوز النطاق الخارجي مباشرة.
- التحليل من الأعلى إلى الأسفل
-
- انحياز HTF (H2 افتراضيًا) كالصورة الكبيرة،
- انحياز إطار زمني المخطط للتوقيت،
- المناطق لمستويات التنفيذ المحددة.
ما ليس عليه (مهم للبيع النزيه)
- إنه ليس روبوت يتداول تلقائيًا نيابة عنك.
- إنه ليس إشارة “الكأس المقدسة” التي تضمن الربح.
- إنه محرك هيكل وانحياز:
-
- يحدد المناطق بموضوعية،
- يحدد الاتجاه/الانحياز بموضوعية بناءً على تلك المناطق،
- يترك إدارة التداول الفعلية للمتداول/الاستراتيجية.
5 | 33 % | |
4 | 67 % | |
3 | 0 % | |
2 | 0 % | |
1 | 0 % |


![شعار "[Stellar Strategies] MARSI Signal Plotter"](https://cdn.ctrader.com/image/webp/7b2b8da6-8f8e-4646-8d4a-4710c516c01e_25567)