
Description
Rejection Zone Signals
A trend-pullback indicator that combines a Fast/Slow MA "rejection zone" with full risk-management visualization. Designed for discretionary intraday traders who want a clean, repeatable framework on 5m / 15m / H1 timeframes.
How it works
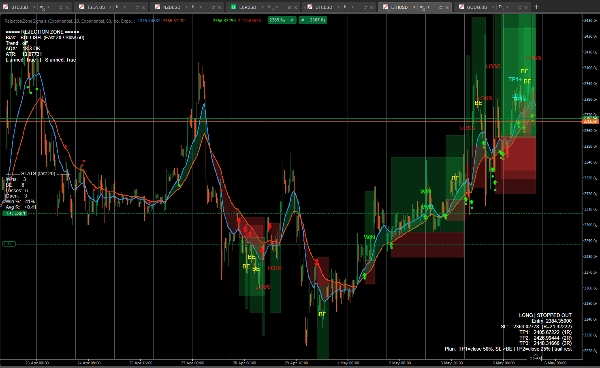
Trend bias is set by the Fast vs Slow moving average (default EMA 20 / EMA 50). When price pulls back into the band between the two MAs and then closes back outside in the trend direction with a confirming candle, the indicator fires an entry signal — but only if the optional 200-MA confluence and ADX filters agree.
Each entry generates a complete trade plan on the chart: entry level, ATR-based stop loss, and three take-profit targets at 1R / 2R / 3R, drawn as a cTrader-style risk/reward box pair.
Features
- Filled MA cloud (green when bullish, red when bearish) — the visible "rejection zone"
- Optional 200-MA trend filter rendered on chart
- Wilder ADX(14) chop filter to skip ranging markets
- ATR-based stop loss with editable multiplier
- TP1 / TP2 / TP3 targets at customizable R-multiples
- R:R box visualization: red risk box (entry → SL), green reward box (entry → TP3)
- Boxes auto-close at the bar where exit conditions are met — no clutter from unfinished levels
- Per-setup outcome badges: WIN / LOSS / BE / OPEN / TP1+ / TP2+
- Live stats panel: wins, losses, breakeven count, win rate, average R
- Sound alert on entry plus dedicated Long/Short signal outputs for cTrader's email/push alerts
- Fully configurable: MA types, lengths, filter thresholds, risk parameters, display toggles
Suggested usage
- Identify a trending instrument with a higher-timeframe scanner or your own bias.
- Load the indicator on 15m or 5m.
- Wait for an arrow that aligns with your higher-timeframe direction.
- Enter at the yellow entry level, place stop and TPs at the drawn lines.
- At TP1: close 50%, move SL to breakeven. At TP2: close 25%. Trail the rest with the Fast MA.
Notes
The indicator processes every tick; signals on the live (in-progress) bar may repaint until the bar closes. For zero-repaint entries, wait for bar close before acting. For ambiguous bars where both SL and a TP are touched, the outcome tracker assumes SL was hit first (conservative for stats).
This is a discretionary tool, not an automated system. Backtest on your symbols and timeframes before live use.