present
Sign up and get $50 off your first purchase
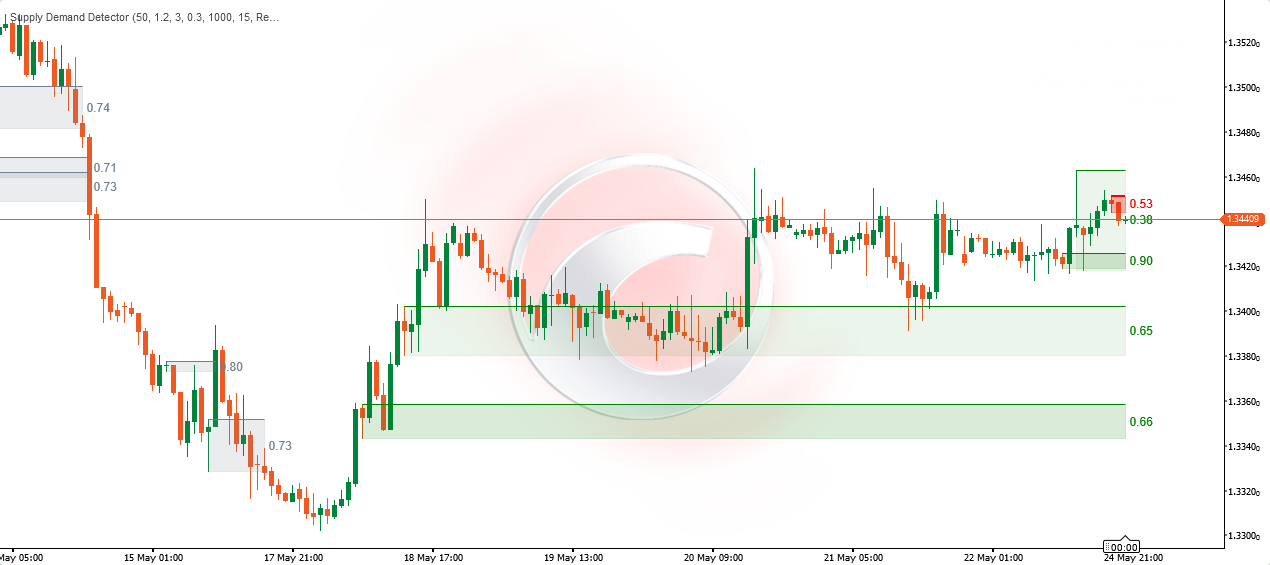
Trading product for Supply Demand Detector Indicator Supply & Demand, image 1
Supply Demand Detector
Indicator
Version 1.0, May 2026
Windows, Mac
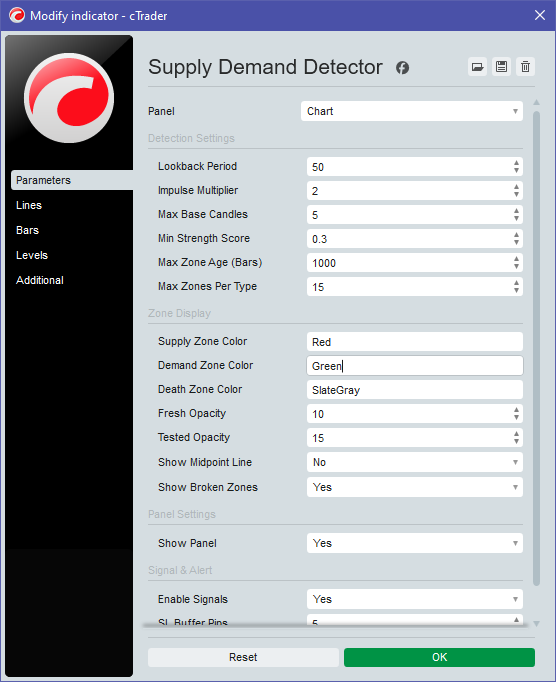
Trading product for Supply Demand Detector Indicator Supply & Demand, image 2
Trading product for Supply Demand Detector Indicator Supply & Demand, image 3
Trading product for Supply Demand Detector Indicator Supply & Demand, image 4
Since 13/05/2026

Description

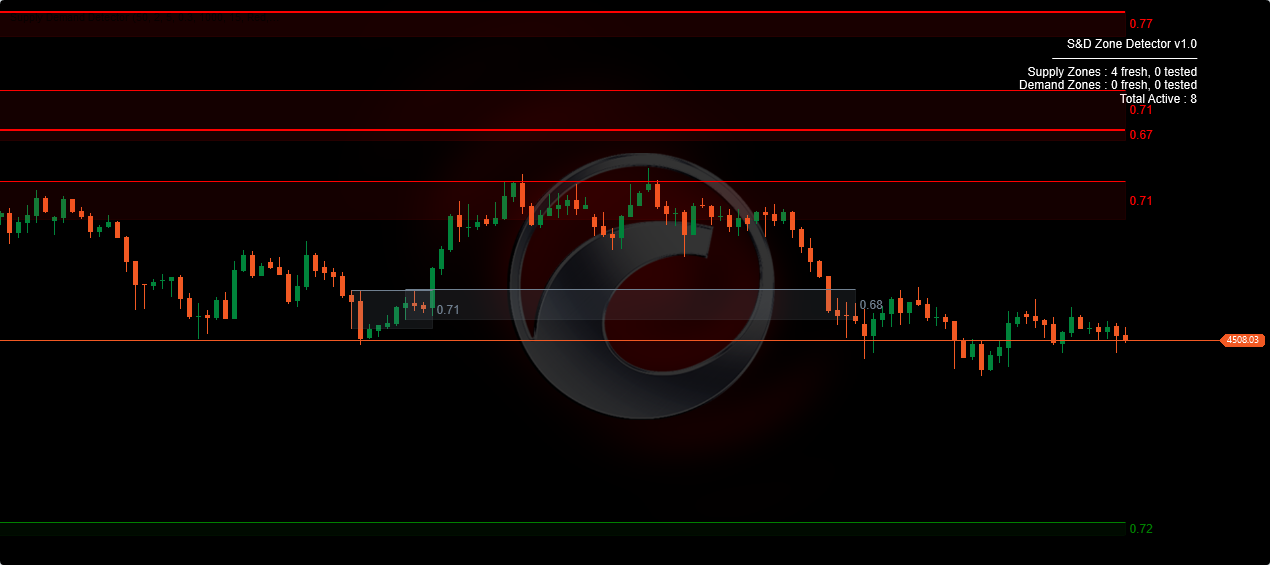
How the Supply & Demand Zone Detector works:

1. Impulse Detection (Finding Institutional Activity)

The algorithm continuously calculates the average body size of the last 50 candles (adjustable via Lookback Period). When it detects a candle that is significantly larger than this average (controlled by the Impulse Multiplier, default 1.2x), it flags it as an Impulse Candle.

  • Bullish Impulse: Indicates institutional buying. Forms a Demand Zone.
  • Bearish Impulse: Indicates institutional selling. Forms a Supply Zone.

2. Base Identification (Drawing the Zone)

Once an impulse is detected, the indicator looks backward to find a cluster of small candles (body size < 50% of the average) immediately preceding the impulse. These are the Base Candles.

  • The Top of the zone is the highest high of these base candles.
  • The Bottom of the zone is the lowest low of these base candles.

3. Strength Scoring

The indicator calculates a strength score (from 0.00 to 1.00) based on three factors:

  1. Impulse Size: How massive the breakout candle is.
  2. Post-Move: How far the price traveled immediately after the breakout.
  3. Base Density: Fewer base candles mean a faster, more aggressive institutional reaction (higher score).
    This score is printed inside the far-right edge of the zone box.

4. Zone Lifecycle & The "Death" Mechanic

As live price moves, the indicator updates the status of the zones in real-time:

  • Fresh (Untouched): The zone is newly formed and highly valid. The box automatically stretches to the right, following the current live candle.
  • Tested: Price touches the zone but does not break it. Generates a Signal Arrow (Buy/Sell) on the chart.
  • Mitigated: Price penetrates more than 50% deep into the zone. The zone is weakening.
  • Broken (Death Zone): If a candle completely closes beyond the zone's opposite boundary (e.g., closes below a Demand Zone), the zone is invalidated.
    • The visual reaction: The zone immediately stops stretching to the right (anchored to the DeathTime), and its color turns into a faded Slate Gray (Death Color) to show it is no longer active.

5. Multi-Overlap Filter

To prevent the chart from becoming heavily cluttered, the indicator checks for overlapping zones. If a newly detected zone overlaps more than 70% with an existing older zone of the same type, the new zone is ignored.

Summary

Indicator profile
Indicator category
Market structure (SMC)
Output type
Visualisation
Data requirements
Bars only
Supported signals
Reversal

Customer reviews

0.0
Reviews: 0
Customer reviews
No reviews for this product yet. Already tried it? Be the first to tell others!

Discussion

FAQ

Supply & Demand
Products available through cTrader Store, including trading bots, indicators and plugins, are provided by third-party developers and made available for informational and technical access purposes only. cTrader Store is not a broker and does not provide investment advice, personal recommendations or any guarantee of future performance.

More from this author
Indicator
BOS
CHOCH
+3
Shows market structure (BoS/CHoCH) and key zones (OB/FVG) to help traders spot high-probability trade setups.
Indicator
Risk Dashboard
AI-powered daily range forecasts help traders spot volatility opportunities and plan stops and targets.

You may also like

Indicator
Alpha Sentiment Pro - See the Market's Pulse Before It Moves
Indicator
RSI
Indicator Stochastic With RSI
Indicator
ATR
RSI
+1
Super Trend Rsi ,ATR + trend change distance + dynamic Alpha, divergence/convergence
Indicator
Prop
Forex
+14
Auto-detect support and resistance & trendlines, highlight pullbacks/BOS retests, and filter with candle confirmation.
Indicator
VWAP
Volume
+5
Multi VWAP. Three timeframes. One clean chart. Your Essential Trading Tool.
Indicator
AI
MACD
+8
A precision-engineered indicator designed for traders who demand signal integrity across volatile markets.
Indicator
RSI
Stochastic
+1
Clean StochRSI panel with trend bias, overbought/oversold zones, and tactical long/short trigger levels for cTrader
Indicator
ATR
Volume
+1
The UT Bot identify potential trend reversals and momentum shifts.
Indicator
ATR
Volume
+2
Heatmap Liquidity Zones Visualize volume-at-price, uncover hidden support/resistance, and track market liquidity in real
Indicator
RSI
Prop
+14
Unlock Stochastic RSI PRO in cTrader! Overlay RSI, highlight zones, and identify divergences with customizable settings.
Indicator
SMC
Prop
+11
Sessions PRO is a professional session visualization indicator - 4 Fully Customizable Sessions
Indicator
Prop
Forex
+9
Average Cost Price helps you keep track of your open positions on the chart. In doing so, it provides lines and explanat
Indicator
MACD
Key Levels
+2
Trend indicator with multi-timeframe filters, generating signals only on fully completed bricks & candles. No Repaint.
Indicator
RSI
RSI on the main chart with 45/55 momentum levels, overbought/oversold levels, averaged RSI, and multi-timeframe support.
Indicator
Prop
Forex
+4
This indicator consists of 3 moving averages that can be configured to your liking, from the type of moving average....
Indicator
ATR
RSI
+3
πŸš€ Specialized algorithm is designed to confirm entry and exit points with precision 🎯
Indicator
RSI
AI-assisted
+1
Transform how you view market momentum with the RSI Velocity Gauge Pro. It's FREE FOR ALL
Indicator
SMC
Prop
+17
Unlock the true intent of market participants with the Classic Proportional Cumulative Volume Delta CVD!

Price

Since 13/05/2026