Description
Renversement à 3 Barres
📊 QU'EST-CE QUE C'EST ?
Le Renversement à 3 Barres est un indicateur technique qui identifie des modèles spécifiques de retournement formés par exactement trois chandeliers consécutifs. Ce modèle classique signale des changements potentiels de direction des prix à travers une structure visuelle claire : un chandelier de tendance, un chandelier d'épuisement et un chandelier de renversement.
🎯 À QUOI SERT-IL ?
Cet indicateur aide les traders à :
- Détecter les renversements haussiers et baissiers avec une structure de 3 chandeliers
- Filtrer les faux signaux grâce à une confirmation de tendance configurable
- Identifier les zones de support et de résistance basées sur des modèles confirmés
- Visualiser les opportunités de trading avec des marqueurs graphiques intuitifs
- Trader des renversements à haute probabilité sur n'importe quelle unité de temps
🔍 COMMENT ÇA FONCTIONNE ?
Modèle Haussier (Renversement Haussier à 3 Barres)
Structure en trois chandeliers :
- Chandelier 1 (Baissier) : Clôture en dessous de l'ouverture - confirme la pression vendeuse
- Chandelier 2 (Épuisement baissier) : Fait de nouveaux plus bas ET de nouveaux plus hauts en dessous du chandelier 1, avec une clôture baissière - signal de capitulation ⚠️
- Chandelier 3 (Renversement haussier) : Clôture au-dessus de l'ouverture ET plus haut au-dessus du plus haut du chandelier 1 - confirme le changement de contrôle ✅
Modèle Baissier (Renversement Baissier à 3 Barres)
Structure opposée :
- Chandelier 1 (Haussier) : Clôture au-dessus de l'ouverture - confirme la pression acheteuse
- Chandelier 2 (Extension haussière) : Fait de nouveaux plus hauts ET de nouveaux plus bas au-dessus du chandelier 1, avec une clôture haussière - signal de sur-extension ⚠️
- Chandelier 3 (Renversement baissier) : Clôture en dessous de l'ouverture ET plus bas en dessous du plus bas du chandelier 1 - confirme le changement de contrôle ✅
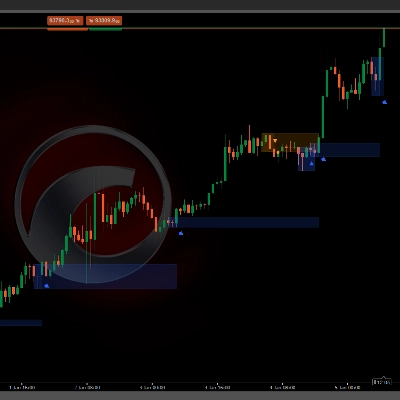
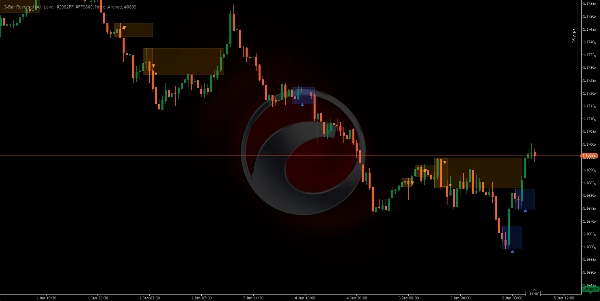
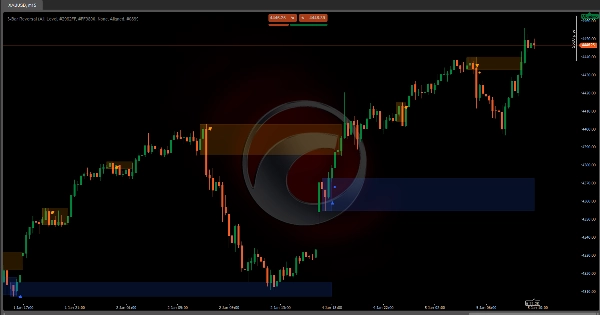
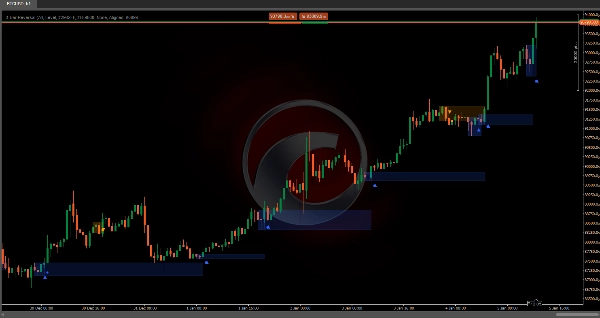
Système de Gestion Visuelle (Machine à États)
L'indicateur traite chaque modèle en trois phases séquentielles :
PHASE 1 - DÉTECTION DU MODÈLE : 🔍
- La structure complète à 3 chandeliers est identifiée
- Un indicateur triangulaire (▲ haussier / ▼ baissier) apparaît sur le troisième chandelier
- Un rectangle semi-transparent de configuration est dessiné couvrant :
-
- Haussier : Du plus haut du chandelier 1 au plus bas le plus bas (chandelier 2 ou 3)
- Baissier : Du plus bas du chandelier 1 au plus haut le plus haut (chandelier 2 ou 3)
- Ce rectangle marque la "zone de bataille" où le renversement a eu lieu
PHASE 2 - CONFIRMATION OU INVALIDATION : ⏳
Le système attend le chandelier suivant après le modèle pour le valider :
Confirmation Haussière : ✅
- La clôture du chandelier suivant doit dépasser le plus haut du chandelier 1 (plafond du rectangle)
- Un point solide (●) apparaît marquant la confirmation
- Le rectangle devient une zone de support active
Confirmation Baissière : ✅
- La clôture du chandelier suivant doit casser le plus bas du chandelier 1 (plancher du rectangle)
- Un point solide (●) apparaît marquant la confirmation
- Le rectangle devient une zone de résistance active
Invalidation : ❌
- Échec haussier si : clôture en dessous du minimum du rectangle OU apparition d'un modèle baissier
- Échec baissier si : clôture au-dessus du maximum du rectangle OU apparition d'un modèle haussier
- Le rectangle cesse de s'étendre (le modèle meurt)
Extension en Attente : ⏸️
- S'il n'y a ni confirmation ni échec, le rectangle s'étend horizontalement chandelier par chandelier
PHASE 3 - ZONE DE SUPPORT/RÉSISTANCE ACTIVE : 🎯
- Une fois confirmé, la zone s'étend indéfiniment vers la droite
- Zone haussière : Reste active tant que le prix reste au-dessus du plancher
- Zone baissière : Reste active tant que le prix reste en dessous du plafond
- La zone se désactive lorsque le prix la casse complètement dans la direction opposée
⚙️ CONFIGURATION PRINCIPALE
Mode de Modèle
Contrôle quelles variations de modèles sont acceptées :
- Normal : N'accepte que lorsque le chandelier 3 clôture À L'INTÉRIEUR de la plage du chandelier 1
-
- Haussier : Clôture < plus haut du chandelier 1 (renversement modéré)
- Baissier : Clôture > plus bas du chandelier 1 (renversement modéré)
- Amélioré : N'accepte que lorsque le chandelier 3 clôture À L'EXTÉRIEUR de la plage du chandelier 1 🔥
-
- Haussier : Clôture > plus haut du chandelier 1 (renversement explosif)
- Baissier : Clôture < plus bas du chandelier 1 (renversement explosif)
- Tous (Recommandé) : Accepte les deux types sans distinction ⭐
Type de Support/Résistance
- Niveau : Fonctionnalité de ligne basique (limitée dans cette version)
- Zone : Dessine des rectangles ombragés marquant les zones SR après confirmation 📦
- Aucun : Pas de zones SR, montre seulement les modèles détectés
Couleurs Personnalisables 🎨
- Couleur du Renversement Haussier : Pour les triangles, rectangles et zones haussières (par défaut :
#2962FF- bleu) - Couleur du Renversement Baissier : Pour les triangles, rectangles et zones baissières (par défaut :
#FF9800- orange) - Couleur de la Tendance Haussière : Pour la visualisation du filtre de tendance (par défaut :
#089981- vert) - Couleur de la Tendance Baissière : Pour la visualisation du filtre de tendance (par défaut :
#F23645- rouge)
🔧 FILTRES DE TENDANCE
L'indicateur peut filtrer les modèles selon la direction générale de la tendance en utilisant quatre méthodes :
1. Nuage de Moyennes Mobiles ☁️
Utilise deux moyennes mobiles pour identifier la tendance :
Paramètres :
- Type de Moyenne Mobile : Simple, Exponentielle, Hull, Pondérée, etc. (par défaut : Hull)
- Période Rapide : 50 (par défaut)
- Période Lente : 200 (par défaut)
Logique du Filtre (Aligné) :
- Tendance haussière détectée lorsque : Prix > MA rapide ET MA rapide > MA lente ✅
- Tendance baissière détectée lorsque : Prix < MA rapide ET MA rapide < MA lente ✅
- Montre uniquement les modèles haussiers en tendance haussière et les modèles baissiers en tendance baissière
Logique Opposée (Opposé) :
- Inverse les conditions pour capturer les renversements majeurs contre-tendance
2. Supertrend 📈
Indicateur de suivi de tendance basé sur la volatilité (ATR) :
Paramètres :
- Période ATR : 10 (par défaut) - fenêtre de calcul de la volatilité
- Facteur Multiplicateur : 3.0 (par défaut) - sensibilité de l'indicateur
Logique :
- Calcule les bandes supérieure et inférieure en utilisant l'ATR
- Prix au-dessus du Supertrend = tendance haussière 🟢
- Prix en dessous du Supertrend = tendance baissière 🔴
- Filtre les modèles selon l'alignement configuré
3. Canaux Donchian 📊
Utilise les extrêmes de prix sur une période :
Paramètres :
- Longueur du Canal : 13 (par défaut)
Logique :
- Canal supérieur = plus haut plus haut des N périodes
- Canal inférieur = plus bas plus bas des N périodes
- Point médian = (supérieur + inférieur) / 2
- Prix au-dessus du point médian = tendance haussière 🟢
- Prix en dessous du point médian = tendance baissière 🔴
4. Aucun (Pas de Filtre) 🔓
Montre TOUS les modèles à 3 barres détectés sans considérer la tendance générale. Utile pour :
- Marchés en range
- Analyse pure de modèles
- Trading de renversement dans n'importe quel contexte
Alignement de Tendance
S'applique lorsque le filtre est actif :
- Aligné : Montre uniquement les modèles qui vont AVEC la tendance identifiée ➡️
-
- Modèles haussiers uniquement en tendance haussière
- Modèles baissiers uniquement en tendance baissière
- Opposé : Montre uniquement les modèles qui vont CONTRE la tendance identifiée 🔄
-
- Modèles haussiers en tendance baissière (renversement majeur)
- Modèles baissiers en tendance haussière (renversement majeur)
Résumé
It operates in three phases: pattern detection, confirmation or invalidation based on the next candle's behavior, and establishing active support or resistance zones that extend while price respects them. The indicator supports configurable pattern modes (Normal, Enhanced, or All) to control acceptance criteria for reversals.
Trend filtering is available through four methods—Moving Average Cloud, Supertrend, Donchian Channels, or no filter—allowing users to align pattern signals with overall market trends or capture counter-trend reversals. Confirmed reversal zones are displayed as shaded rectangles or levels, customizable in color for bullish and bearish signals, trend filters, and zones.
This tool is designed for use on any timeframe and across various markets, including forex pairs (EURUSD, GBPUSD, USDJPY, NZDUSD), commodities (XAUUSD), indices (NAS100), and cryptocurrencies (BTCUSD). It aids traders in detecting high-probability reversals, filtering false signals, and identifying support and resistance zones with clear visual markers.