
Wskaźniki Pinescriptlabs Store: Pinescriptlabs Store cBots : (cBot) Gold & BTC BreakoutSession Pivots(nowy)
Projekcja płynności ceny ZigZag
Trailing Smart Algorithm (nowy)
Prognoza oparta na Linreg & ATR
SmartTrend Wsparcie &
Opór
Linie
Dynamiczna
Analiza struktury rynku
punktów
zwrotnych
Punkty
Fibonacci
Regresja liniowa
wieloczasowa
Multi-timeframe
Wielopoziomowy
Tracker nachylenia świec
Tracker
Auto
Wsparcie i
Opór
Linie trendu
Linie
Wszystkie
Wsparcie i
Poziomy oporu
Poziomy
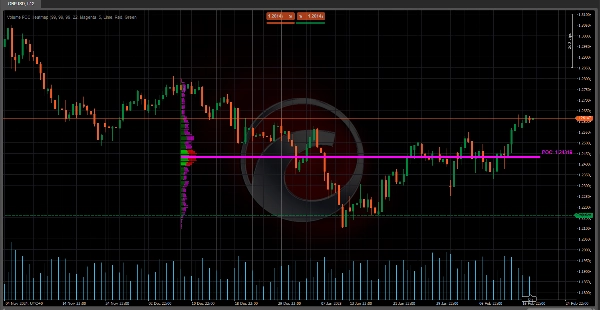
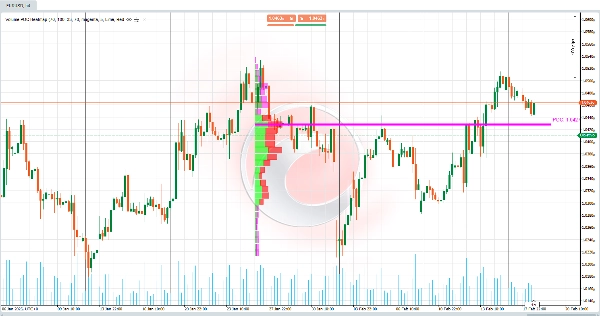
🔥 Mapa cieplna Volume POC 🔥
Ten wskaźnik to Profil wolumenu , który pokazuje rozkład wolumenu obrotu na różnych poziomach cenowych w określonym okresie. Jego głównym celem jest identyfikacja kluczowych stref wsparcia/oporu oraz obszarów, gdzie rynek wykazał największe zainteresowanie (duża aktywność kupna/sprzedaży). Jest bardzo przydatny do:
- Wykrywania Punktu Kontroli (POC) 🎯
Poziom cenowy z największym wolumenem, działający jak magnes dla ruchu cenowego. - Wizualizacji Obszaru Wartości (VA)
Strefy, w której skoncentrowany jest określony procent całkowitego wolumenu (np. 70%), wskazującej równowagę między kupującymi a sprzedającymi. - Rozróżniania wolumenu byczego i niedźwiedziego 📈📉
Pokazuje, gdzie kumuluje się siła kupujących w porównaniu z presją sprzedających.
🧠 Kluczowa logika i obliczenia 🔢
- Podział zakresu cenowego 📏
-
- Zakres cenowy (od najniższego do najwyższego w ostatnich B słupkach ) jest dzielony na Komórki wolumenu (CNum) .
Przykład: Jeśli CNum = 33 , zakres jest podzielony na 33 równoodległe poziomy.
- Zakres cenowy (od najniższego do najwyższego w ostatnich B słupkach ) jest dzielony na Komórki wolumenu (CNum) .
- Rozkład wolumenu według poziomu 📊
-
- Dla każdego słupka w danych historycznych:
-
- Obliczany jest wolumen związany z korpusem (różnica między otwarciem a zamknięciem) oraz knotami (maksima i minima).
- Wolumen jest proporcjonalnie rozdzielany na komórki cenowe przecięte przez słupek.
Przykład: Jeśli zielony (byczy) słupek obejmuje 3 komórki, wolumen jest przypisany głównie do tych komórek jako "wolumen byczy".
- Obliczanie Punktu Kontroli (POC) 🎯
-
- POC to komórka z najwyższym skumulowanym wolumenem, reprezentująca cenę, przy której istniał największy konsensus między kupującymi a sprzedającymi.
- Obliczanie Obszaru Wartości (VA) 🔄
-
- Rozszerza się od POC w górę/w dół, aż obejmie określony % całkowitego wolumenu (np. 70%).
Przykład: Jeśli VA obejmuje zakres od 100 do 105 , oznacza to, że 70% wolumenu zostało wynegocjowane w tym zakresie.
- Rozszerza się od POC w górę/w dół, aż obejmie określony % całkowitego wolumenu (np. 70%).
- Normalizacja wizualna 🖼️
-
- Wolumeny są skalowane za pomocą Czynnika skali , aby dostosować szerokość słupków na wykresie, ułatwiając wizualizację.
🛠️ Klucz do mapy cieplnej Volume POC 💡
- Brak kontekstu w tradycyjnych wskaźnikach wolumenu 🤔
Klasyczne wskaźniki wolumenu (np. wolumen słupek po słupku) nie pokazują, gdzie wolumen był wynegocjowany. Ten wskaźnik mapuje wolumen według poziomu cenowego, rozwiązując ten problem. - Organiczna identyfikacja wsparcia/oporu 🚀
Strefy z dużym wolumenem działają jako dynamiczne wsparcie/opór, bardziej wiarygodne niż statyczne linie. - Wykrywanie nierówności ⚖️
Obszary z przeważającym wolumenem byczym lub niedźwiedzim sygnalizują potencjalne wybicia lub odwrócenia.
💡 Praktyczne zastosowanie w handlu 📈
- POC jako strefa zainteresowania 🎯
-
- Jeśli cena zbliża się do POC, oczekuj reakcji takich jak odbicia lub konsolidacje.
- Obszar wartości (VA) jako strefa równowagi 🔄
-
- Jeśli cena jest poza VA, ma tendencję do powrotu do niej (efekt magnetyczny).
- Jeśli cena jest wewnątrz VA, może to wskazywać na konsolidację.
- Wolumen byczy/niedźwiedzi jako potwierdzenie 🔍
-
- Wzrost wolumenu byczego przy oporze sugeruje potencjalne wybicie.
- Wysoki wolumen niedźwiedzi przy wsparciu wskazuje na możliwe przebicie.
🌟 Przykład 📊
Parametry użyte (widoczne i konfigurowalne przez użytkownika):
- Bars Back = 55 → Liczba analizowanych historycznych słupków.
- Volume Cells = 33 → Liczba podziałów/komórek w zakresie cenowym.
- Value Area Volume % = 70 → Procent wolumenu definiujący Obszar Wartości.
Sytuacja:
- Cena przebija poziom wsparcia technicznego, ale wolumen w tej strefie jest niski (według profilu).
- Później cena wraca do Obszaru Wartości (VA) zdefiniowanego przez 70% całkowitego wolumenu.
Interpretacja:
- Wybicie było fałszywe (z powodu niskiego wolumenu w strefie wybicia).
- Rynek dąży do wyrównania w ramach Obszaru Wartości , gdzie jest większa aktywność (wysoka gęstość wolumenu).
Działanie:
- Szukaj okazji do kupna w pobliżu dolnej granicy VA lub POC, ponieważ są to strefy dużego zainteresowania uczestników rynku.
5 | 100 % | |
4 | 0 % | |
3 | 0 % | |
2 | 0 % | |
1 | 0 % |


![Logo „[Stellar Strategies] Linear Regression Candles 1.1”](https://cdn.ctrader.com/image/webp/8b9cff9f-2431-46d2-b0ec-c7f55f4a4a6d_27918)